Dyson DC65 Review – Now at Best Buy

The reviewer has been compensated in the form of a Best Buy Gift Card and/or received the product/service at a reduced price or for free.  {I was given the product for free.}

I don’t think I ever gave vacuum cleaners a second thought before I was a married – and the owner of a shedding dog.  As long as it did the basics, you know pick up dirt, I was happy. Then I gained a beautiful shedding friend and choosing a new vacuum required extensive research.  Four years ago {Time flies, doesn’t it?} I reviewed a Dyson, a Dyson-DC25 Animal to be exact, and I fell in love!  It had a convenient, out of the way hose, attachments that stored on the vacuum, and enough suction power to suck up the dirt beneath my rug.  Yea, it was awesome!  It had a few cons but overall I don’t think I’ll ever own a different brand of vacuum.  I am loyal to Dyson.

Dyson-DC65

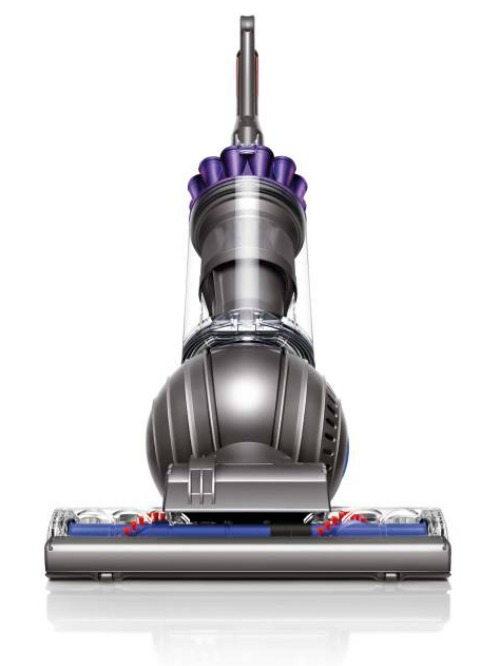
When my brand new shiny Dyson DC-65 Animal arrived my husband and I were very excited to get it set up and give it a test drive.  We were curious if the cons we had with the old vacuum were improved with this newer model.  Was Dyson really listening to our review?

Assembling the Dyson

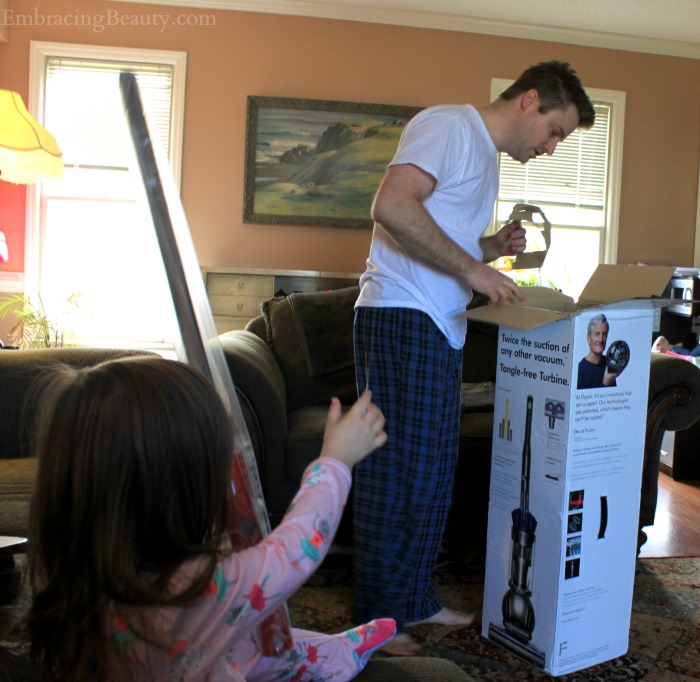
My husband and daughter began assembling our Dyson last Saturday morning after breakfast.

Dyson Assembly

It’s so easy to assemble even a kid could do it!  Okay, not my two year old but probably an eight year old.  Everything simply snaps into place.  Honestly, it’s that easy!  You see that card my husband was holding?  Those are the picture instructions.

Dyson Quick Start Guide

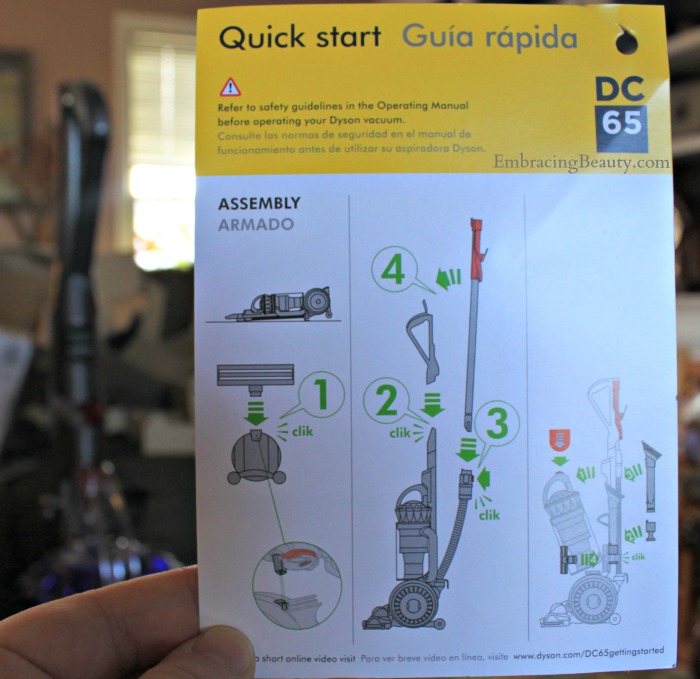
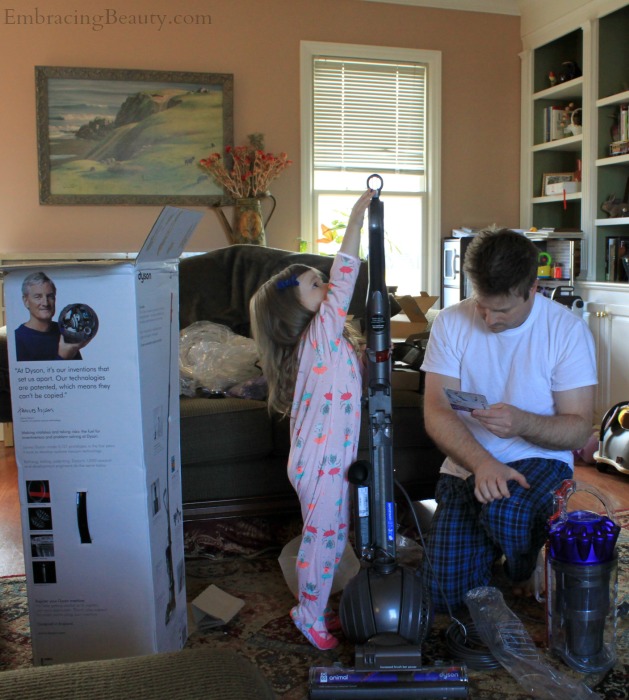
Here it is.  I just had to show you how unbelievably simple it was to put together.

Dyson 65 Animal Review

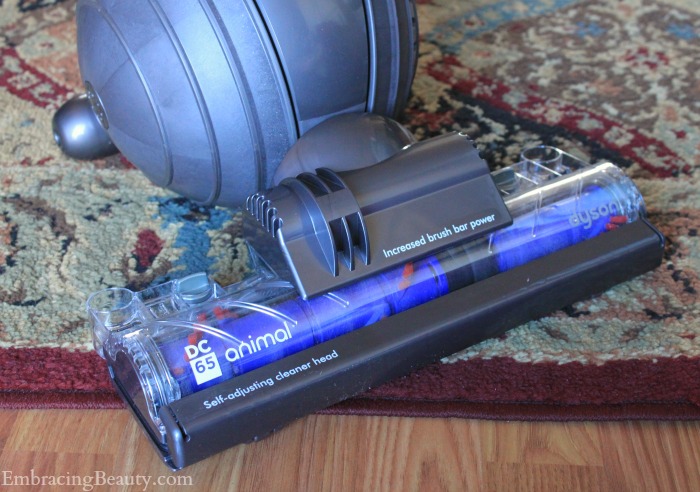
Many competitors claim superior performance on carpet {which I don’t believe}, but 75% of US homes have a combination of carpets and hard floors.  The Dyson-DC65 glides effortlessly on carpet and hardwood.  One button makes the simple transition.  It cleans thoroughly on hard floors without scratching them.

Things I love about my Dyson:

– It doesn’t clog. Ever.

– The ball helps it move with ease, especially around corners.  You have to try it to believe it!

– It’s purple!! I just had to throw that in because in my book aesthetics count too. {It also comes in Platinum and Fuchsia}

– Telescoping wand reaches everywhere. I love it for our steps and those pesky corner cobwebs.

– It has an easy to clean washable lifetime HEPA filter that traps microscopic allergens like pollen and bacteria.  Yuck!

– Bagless and it has a clear bin so you can know when it’s time to empty it.

– The bin empties effortlessly with just the push of a button.

Tangle Free Dyson

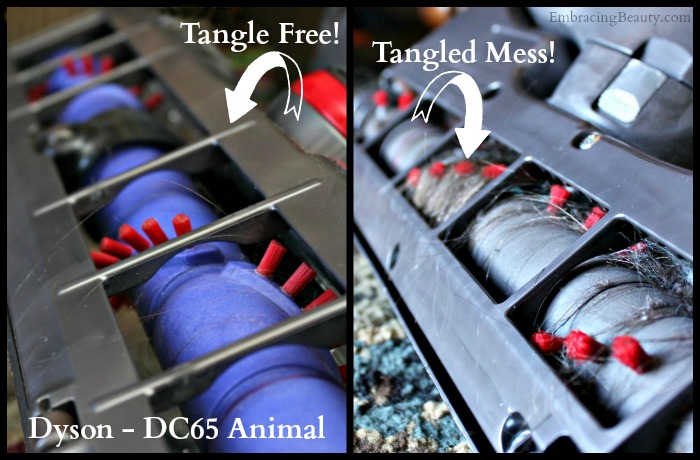
One thing I didn’t enjoy about my older Dyson was that it accumulated hair around the beater bar.  It did this A LOT less often than my other model vacuum that I used to own but it still required me to break out the thread ripper and get messy every so often.  The new Dyson has a new and improved beater bar and as you can see pictured above there is very little hair there.  For those who are wondering, this picture was taken after we vacuumed our entire house and trust me, it was dirty!

This new bristle configuration will also help dig deeper into carpets to remove more dirt.  You’ve got to love that!

Dyson Canister of Dirt

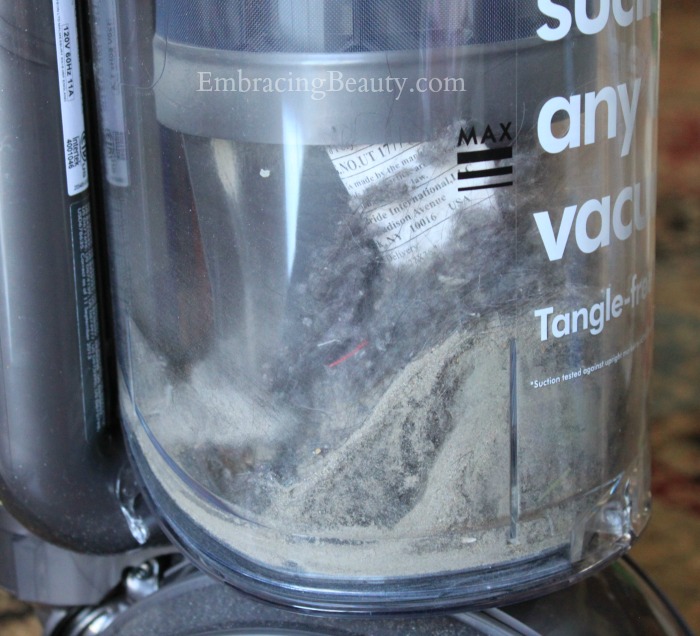
See, just look at all that dirt and hair!  I’m sad to admit that this was after we emptied the bin a time or two.  I don’t know about you but I just hate the thought of all that dirt in my home!

Dyson Cleaning Path

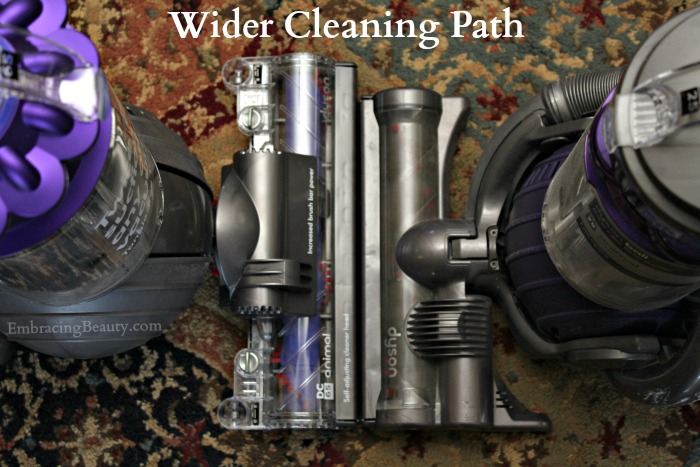
The new Dyson-DC65 Animal has a wider cleaning path than my old Dyson did.  It covers more ground in less time.  What’s not to like?  Plus, I read the new beater bar has 25% increased power for superior cleaning.  Nice!

New Dyson has a long cord

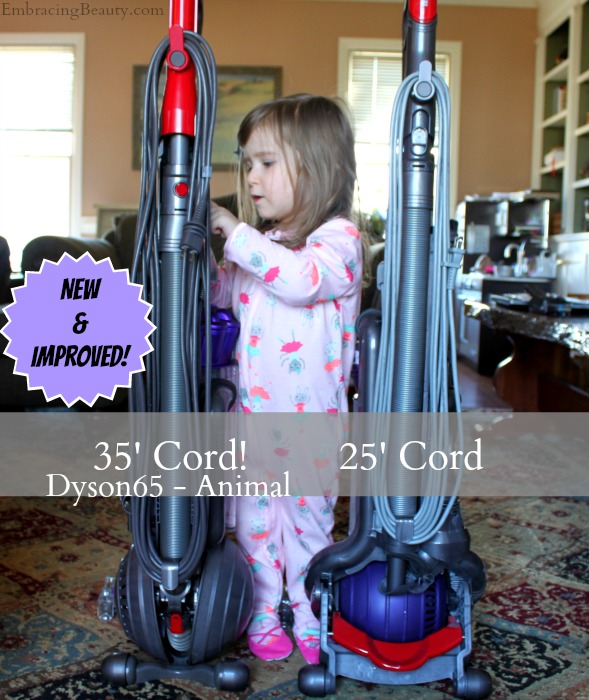
Here is my lovely model pointing out that this new model has a 10 foot longer cord than my previous model.  Dyson was listening!!!  {Thank you, Dyson!}

Dyson Animal Review

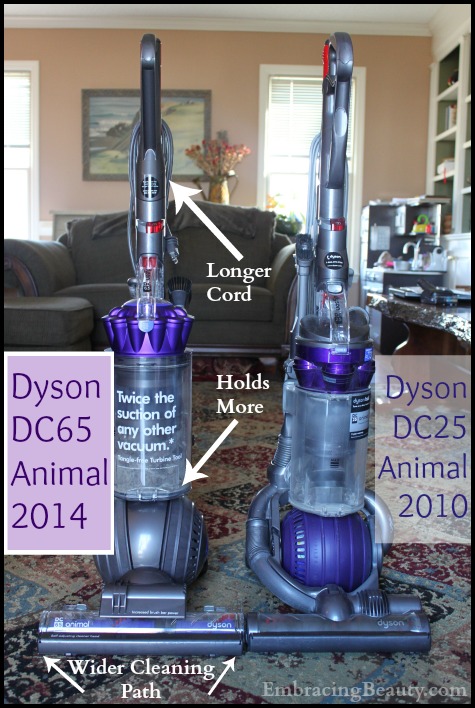
In review, the Dyson-DC65 Animal has a longer cord, wider cleaning path, and it holds more than the Dyson-DC25 Animal that I loved dearly.  Trust me, no matter which Dyson you buy you can’t go wrong!

Daddy and daughter nap

Here’s my sweet daughter resting with her daddy after a tiring morning cleaning.

Dyson DC65

Let me just stop for a minute and brag about Dyson.  We had an in home demonstration for a well-known vacuum brand to help a friend out, you know how that goes.  Well, my friend did her spiel about her vacuum and how disgusting the dirt and bacteria are that are lurking on our floors and furniture.  She about had me sold because I have allergies, I hate dirt, and her vacuum sounded superior to all others.  I was almost sold, that is, until she did her demonstration and wanted to compare it to mine {the older Dyson}.  I think the results shocked her.  Her vacuum didn’t pick up aaaaanything after we ran ours.  Nothing.  That was the day that I became completely loyal to Dyson!  It was just as good {if not better!} than a $1,000+ vacuum that was hard to maneuver, difficult to clean, and did I mention it was over a grand!?

If you want a vacuum you can brag about and depend on, look to Dyson.  It has a five year warranty and is built to last 10+ years.  It’s not cheap but in my opinion it’s worth the cost.

Visit Best Buy online to read more or in store to give them a test run!

-$499 (for Multi-Floor)

-$599 (for Animal): comes w/ TFT and dusting brush {What I received}

-$649 (for Animal Complete): comes with extra tools and Zorb, TFT, and dusting brush

Oscar Worthy Style

Red Dress Set

Just in time for tonight, I have put together a beautiful set that I think rivals the looks of those at the Oscars.  While a handful of our favorite actresses, actors, and directors will battle it out tonight for tiny statues I thought you might be interested in doing a little shopping…or browsing or pinning.  Here are the items that I have pictured above:

Mermaid Scoop Neck Evening Dress JenJenHouse.com ($176.99 on sale from $266)

– MAC Lipstick in New Temptation – Nordstrom ($17)

– Simulated Diamond Tennis Bracelet – Beverly Hills Silver ($59.99 on sale from $120)

– Firework Crystal Ring – Boutique 1 ($131 on sale from $329)

– Perfume Bottle – Frette ($82.50 on sale from $165)

– Clinique Nail Enamel for Sensitive Skin in Red, Red, Red – Neiman Marcus ($12.50)

– Frame Clutch Bag – Accessorize ($43)

Do you like the look I put together?  Who are you pulling for tonight?

KitchenAid Giveaway Ends March 31, 2014

Kitchen Aid Giveaway! Ends March 31st

In honor of St.Patrick’s Day I thought it would be fitting to giveaway another Green Apple KitchenAid mixer, just like we did last year!  Annual tradition in the making?  Maybe.  

My KitchenAid mixer is probably my favorite tool in the kitchen and I am loving this Green Apple color.  It almost makes me want to swap out my Empire Red one for it.  Almost.

One lucky winner will receive:

Green Apple 5 Quart Artisan Series ($349.99)

5 quart capacity, 10 speeds

Green Apple finish

325 watt motor for 9 cup flour power

Stainless Steel Bowl with Handle

Includes beater, dough hook and wire whip


How to Enter?

Enter via the Rafflecopter form below and if you have any questions please feel free to ask.  This giveaway is only open to those 18+ and who have a valid U.S. shipping address.

a Rafflecopter giveaway

How to Get a Perfect Manicure

Steps to a Perfect Manicure

Ever since I tried my hand at nail art two years ago I’ve received numerous comments and emails asking me questions about basic nail polish techniques.  How do you avoid getting it on your fingers? Do you need a top coat?  How do you care for your cuticles?  They are basically asking, “How do you get a perfect manicure?”

The biggest tip I can give anyone is to practice but I also want to share with you the steps I go through for the perfect manicure.  I hope you’ll find this helpful and not too overwhelming!  Remember, you don’t have to change everything at once.  Just pick a few new tricks to add to your routine.

Clean Under Nails

Step 1:  Wash your nails thoroughly with soap and water to remove any dirt/oil/etc.  You could also opt to soak a cotton ball in rubbing alcohol and rub over your nails to help your polish adhere better and last longer.  I usually skip the alcohol but it does work!

Make sure all remnants of your old polish is removed.  A nail brush {or a tooth brush} soaked in your favorite nail polish remover is a great way to scrub off stubborn polish.

Don’t forget to clean under your nails too!  You could use a nail tool to clean under there in addition to using a nail brush.  I don’t know about you but I’m always a bit paranoid about the dirt and germs under there!

Pushing Back Cuticles!

Step 2: Push back your cuticles.  You can grab a cheap cuticle pusher at a number of locations.  When cuticles are pushed back they leave an even surface for you to paint.

Trimming Nails

Step 3:  Trim your fingernails to your desired length.  Don’t worry about shaping them here, just focus on the length.

How to get even nails

A great way to make sure your manicure ends up nice is to make sure your nails are all roughly the same length when you begin.  If they’re not, clip them again or you can spend extra time filing.

Glass Nail Files - I love them!

Step 4:  File your nails to your desired shape.  Mine are naturally square, while others are naturally round, but I try to file mine somewhere in between.  If you use an old emery board file only in one direction.  However, if you use a glass file you can freely file in both directions.  I’m a huge fan of glass nail files because they are gentle on your nails, more hygienic than emery boards, they’re easily sterilized, they never dull, and they file quicker than emery boards.

Buffing Nails

Step 5: Buff your nails. You don’t have to spend a fortune on a good buffing block.  The ones at Target that are around a dollar work lovely.

Nail Buffing Block - Removes ridges and adds shine!

Think of a buffing block like sandpaper.  You don’t want to use it too often or your nails will become very thin but using it once in a while will give your nails a healthy, smooth, and youthful appearance.  The buffing block I use is a foam block that has four different colored sides labeled File, Buff, Smooth, & Shine.

Side one: File – This would replace a nail file so I skip this side.

Side two: Buff – Rub this coarse side back and forth over your entire nail to help buff away ridges and peeling.  Don’t be excessive on this step or you could damage your nails.

Side three: Smooth – This side uses a finer “sandpaper” to help smooth down any small imperfections the buffing left behind.

Side four: Shine – This final step will leave a beautiful shine to your nails.  They’ll look gorgeous with or without polish!  {If I leave my nails bare I’ll often redo this step every few days to maintain my nails’ shine.}

How to Remove Hangnails!!

Step 6: Remove hangnails.  Use cuticle trimmers to quickly and painlessly remove any hangnails you may have.  This will not only leave your nails looking much nicer but also save you from the discomfort and frustration that hangnails bring.

Step 7: Apply a base coat to your nails to help your polish last longer.  My current favorite is OPI’s Nail Envy but Sally Hansen’s Strong as Nails is a close second.

How to paint fingernails!

Step 8: Paint your nails.  This is the fun part and is also the step that most people skip ahead to.  It’s not always necessary but don’t your nails look so much nicer at this point when you take the time to do a little prep work?  I think so.

When I paint my nails I start by painting one stroke down the center of my nail and then one on each side.  This is what works for me and is how I’ve painted my nails since I was in grade school but that doesn’t mean it will work for you.  Practice a variety of applications and soon you’ll find a technique that works for you and leaves your nail polish smooth and even.

If you have an opaque shade of polish you may need to apply a second coat.

Step 9: Add a top coat for a lasting, chip-resistant finish, and if you use the top coat I do it will leave you with a high gloss shine.  I can’t say enough good things about Julep’s Polymer Top Coat.  I LOVE this stuff.  I’ve told Julep that if they ever stop selling it they have to tell me in advance so I can buy a lifetime supply from them.  Yes, it’s that good!  Allow your polish to dry for 2-3 minutes then apply Julep’s Polymer Top Coat and let set for 3-5 minutes in indoor lighting {Nothing fancy, just a regular fluorescent bulb}.  Then your nails will be completely dry and smudge-proof.

Dip a paintbrush in acetone to remove stray polish - genius!

Step 10:  Clean up.  This is a trick I learned while going through an artsy stage in high school.  Cleaning up the left over nail polish around my nail drove me nuts because nothing seemed to work.  As careful as I tried to be there was always just a teensy bit of polish where I didn’t want it.  Then one day the answer dawned on me!  I dipped one of my smallest art brushes in nail polish remover then rubbed it on the skin around my nail.  It worked wonders and I felt like a genius.

I think I’m the only one in the beauty world who doesn’t like a gap between my polish and my cuticle.  I want it right up to the edge without crossing over.  However, if you’re in the vast majority who like this new gap trend you could take a tiny brush and swirl it around the inside of your cuticle to give you that look.

You can pick up a brush at your local craft store for a few bucks and it will last you years and years.  I’m still using that brush I first experimented with in high school and I don’t want to think about how many years ago that’s been!

Silver Heart - Valentine's Day Nails!

There you have it, folks!  Those are the ten steps I take when I want to achieve a perfect manicure.  What steps do you take when you attempt a perfect DIY manicure?

10 Makeup Tips to Look Gorgeous This Winter

I am a member of the Collective Bias®  Social Fabric® Community.  This shop has been compensated as part of a social shopper amplification for Collective Bias and its advertiser. #WalgreensBeauty #CollectiveBias

10 Tips to Look Gorgeous This Winter

Are you feeling less than beautiful this season?  Do you need a few makeup tips to perk up your demeanor?  With the dropping temperatures it’s common to have a dull complexion, frizzy hair, and blotchy skin.  I’m here to share my favorite 10 tips {and products} to help you banish your winter beauty blues.  Are you ready?  Let’s get started!

CoverGirl TruMagic

1.)  Choose a new foundation.  As the seasons change so should your makeup…and I’m not just talking about colors.  As the cold weather approaches it’s important to choose a foundation that leaves your skin feeling dewier than the one you previously used in the warmer months.  I recommend skipping powder all together.  If you’re skin has a tendancy to shine here and there try CoverGirl’s mattifier.  It will tame the shine without settling in your wrinkles or drying out your skin.  This is one of my new favorite drugstore buys!  Products to try: Maybelline Dream Smooth Mousse Makeup and CoverGirl TruMagic Mattifier.

Yes to Cucumbers

2.)  Swap out your shampoo.  Most shampoos contain sulfates, which do a great job at cleaning hair so much so that they can also strip away important oils.  Using these shampoos will leave your scalp feeling itchy, flaky, and dry during the colder months.  Look for sulfate-free shampoos and moisturizing conditioners to keep your locks looking lovely.  Products to try:  Yes to Cucumbers, TRESemme, and Organix shampoos and conditioners.

Sally Hansen

3.)  Paint your nails.  A new shade of nail polish can brighten anyone’s spirits.  You could go with a natural or a bold polish, the choice is yours.  When removing polish use an acetone-free nail polish remover to help nails maintain their moisture.  {Check out my natural secret to beautiful nails.}  Products to check out: Sally Hansen Salon Manicure, Revlon, or Maybelline.

Olay Beauty Bars

Gold Bond Lotion

4.)  Ban the hot water.  Okay, if you’re like me and just can’t give up your long, hot baths, try substituting your regular bubble bath with a few drops of  bath oil.  You can also swap your old bar of soap for a moisturizing bar or body wash.  When you get out of the shower don’t try off completely and apply body cream all over.  Body creams are better than lotions.  The thicker and richer the product the more moisture it gives your skin.  Products to try: Olay moisturizing beauty bar or body wash and Gold Bond Soothing cream.

Yes to Cucumbers

5.)  Cleanse gently.  Washing your face with a product that over dries it will cause your face to produce more oil, lots of it, leaving you with shine and if you’re like me, acne.  If you can stand creamy facial cleansers that don’t require rinsing those would be great to use during the winter.  {I personally can’t use them because it seems so wrong to have a creamy cleanser.  It just weirds me out.  I know that’s stupid but I can’t get past it.}  Instead, I opt for facial cleansing cloths that remove makeup and grime without rinsing.  Products to try: Aveeno Ultra Calming Makeup Removing Wipes, Yes to Cucumbers Facial Towelettes, or Oil of Olay Facial Cleansing Cloths.

Vaseline Lip Therapy

6.)  Moisturize your lips.  The winter temps and wind can quickly chap and crack your lips.  Protect your lips with a nourishing lip balm, not the waxy ones, or enjoy a creamy layer of Vaseline Lip Therapy like I do.  {I know it doesn’t treat or moisturize my lips but it seals in moisture and well, I just like it.}  {Check out 15 Beauty Uses for Vaseline}  I also alternate between Vaseline Lip Therapy, Burt’s Bees colored lip products and Carmex.  I love all three brands so much that it’s hard to chose just one.  I keep one, at least one, in every diaper bag, purse, and if I’m honest…in just about every room of our house.  I hate to be without my lip products in winter!  Nobody likes dry lips, nobody.  Products to try: Vaseline Lip Therapy, Carmex, or Burt’s Bees lip products.

Humidifier

7.)  Hydrate while you sleep.  Indoor heat dries out the air in every home so grab a humidifier {or two} to help combat itchy, dry skin.  Products to try: Crane humidifier.

8.) Drink more water.  It’s no secret that water is good for you but many of us don’t drink the recommended 8 glasses a day.  Thinking about why I’m drinking water it a good motivation for me to continue to drink.  It helps flush out things that shouldn’t be there, keeps your body hydrated, and drinking water also helps improve the appearance of your skin.  Win-win!

Covergirl Bombshell

9.)  Use a primer.  A primer will help protect your face and keep those blotchy spots at bay.  It also prevents a cakey look that can happen when makeup is applied over dry skin.  A good primer will help your makeup go on evenly and last all day.  Don’t forget to quickly swipe on a coat or two of your favorite mascara to make your eyes pop.  Products to try: L’Oreal Paris Anti-Redness Skin Primer, CoverGirl Bombshell Volume.

10.)  Sleep!  This advice isn’t specific to winter but it’s a good thing to be reminded of all year long.  Wanna know a little secret?  Beauty sleep is a real thing.  It’s true!  Our bodies repair themselves while we’re sleeping so not only is our mood improved with a good night’s sleep but so is our skin.

Walgreens Shopping

Because I love affordable beauty products all of the items I suggested above can be found at your local drug store.  The items I pictured above were purchased at my local Walgreens which has a great makeup aisle and incredibly friendly makeup department workers.  {They always have extra beauty coupons on hand, I love these ladies!}  Here’s a picture of my husband making a silly face while shopping with me in the Walgreens beauty department.

What changes do you make to your beauty routine during the winter months?  Also, what are your favorite winter beauty buys?  I’d love to know!

Two Weeks Ago Today

Two weeks ago this morning I woke up, rolled over, rolled over again, and just about burst into tears.  After a few minutes of flip flopping I realized the pain in my stomach wasn’t from the cheeseburger I ate the night before.  I laid there trying to gain composure as I ran over the “game plan” in my head before I woke Mike up.  I was having contractions!

Two hours later I was on my way to the hospital with contractions that were two minutes apart.  I walked into the hospital clenching my husband’s arm and stopping every minute and a half for another contraction.  Every lady that passed me by either wished me luck or gave me the famous southern sympathy, “Bless your heart.”

One lovely epidural, seven hours of napping, and four pushes later I had one of these:

Baby and New Mom

I am very blessed.

Happy Valentine’s Day to you and yours!

Valentine Heart Cookies with Splenda #Moms4JNJConsumer

This post is part of the HEALTHY ESSENTIALS® 2014 program by Johnson & Johnson Consumer Companies, Inc. and The Motherhood, who sent me a box of products and compensated me for my time. Opinions, experiences and photos shared here are all my own, and I hope you enjoy them.

Valentine Heart Cookies

Tomorrow is Valentine’s Day and we’ll be spending the day at home.  That’s not as bad as it sounds.  You see, we have a brand new baby at our home and that is reason enough to stay in and skip the crowded restaurants but we’re also in the middle of a snowstorm.  Up north this snowstorm wouldn’t be worth mentioning but here in this part of North Carolina, this is an epic storm.  The roads are icy, neighbors who’ve never spoken are out playing in the snow and getting to know one another, and kids are sledding and building snowmen.  Check out the one my daughter and husband built. {By the way, pictures of our new member of the family are coming soon!…and I don’t mean the snowman.}

Georgia Snowman

Since we’re going to be cooped up in the house for Valentine’s Day I think I’m going to make my husband something sweet to celebrate.  Maybe I’ll bake cinnamon rolls, a pie, or my husband’s favorite, cookies.  I made the Valentine Heart Cookies {pictured above} for him before and he really liked those.

No matter what treat I make I know two things, 1.) my daughter will “help” me bake them, 2.) I’ll substitute sugar in the recipe for Splenda.  My daughter always enjoys baking and helping mom and dad cook and this is an opportunity to help give Daddy a gift of her own.  I’ve substituted Splenda in recipes in the past and could never tell a difference but overtime I got out of the habit.  Now that I’m ready to shed a little post-baby weight I’m choosing to take small steps here and there to help live healthier.

If you’ve never used Splenda before it’s simple.  1 cup of Splenda is equal to 1 cup of sugar.  Anywhere you use sugar in cooking or baking you can use Splenda.  If you plan on baking a heartwarming treat for someone you love this Valentine’s Day try substituting Splenda for a sweet treat without all the added calories.

Use cookie cutters on baked cookies

To make the cookies pictured at the top of this post I used my favorite strawberry white chocolate cookie recipe and baked them as directed.  Then I look a heart shaped cookie cutter to make them look extra sweet.  I had no problem eating the scraps but the heart cookie makes a much nicer looking gift.

Raspberry Heart Cookies

Learn how to make delicious Raspberry Heart Cookies (made with Spelnda No Calorie Sweetener) that taste as good as they look by visiting Splenda.com.

Get a printable coupon for $1 off any SPLENDA® No Calorie Sweetener product at HealthyEssentials.com.  To sweeten the savings, you could get a free 30 minute nutrition consultation with a Registered Dietitian when you buy $10 of SPLENDA® Sweetener Products between now and February 17, 2014 – up to $75 value!  More details on this special offer at HealthyEssentials.com.

How are you celebrating Valentine’s Day this year?

Cheesy Bacon Breadsticks Recipe #BaconLove

Disclosure: This is a post written in partnership with Bi-Lo but all opinions remain my own.

Everybody Loves Bacon

Can I see a raise of hands for those who love bacon?  That’s right, most of you do…and for good reason, it’s ridiculously yummy!  Recently, Bi-Lo asked me to come up with my own recipe using bacon for their “Everybody Loves Bacon Event.”  I spent days and days thinking of a recipe that could be improved upon by the addition of bacon and I came to the conclusion, “What recipe couldn’t?”  {See my bacon chocolate chip cookie recipe}  After much deliberation and searching Pinterest to make sure my recipe wasn’t taken I decided on Cheesy Bacon Breadsticks!

Breadsticks are one my favorite foods to indulge in.  No, they’re not healthy and they don’t claim to be.  They’re just warm, cheesy sticks of goodness.

Cheesy Bacon Breadsticks

Don’t they make your mouth water?  Mmm, they sure do mine and I just finished off a small plate of these earlier tonight.  The best thing about these are is that you can use your favorite breadstick recipe and add bacon to the top.  You don’t have to learn a new recipe if you don’t want to.

Ingredients:

cups warm water (about 115°F)
2 tbsp sugar
½ tsp salt
½ cup non-fat dry milk
1 tbsp yeast
3 cups flour
½ cup melted butter (half for the bottom of the pan and half on top of the breadsticks)
8 oz package of mozzarella cheese
Sprinkle with crumbled fried bacon, garlic powder, Parmesan cheese, salt & pepper (to taste)


Directions:
Dissolve yeast in the warm water and let rest for 5 minutes. Add sugar, milk, salt, and enough flour to make a thin soup-like consistency.  Once blended add the rest of the flour, enough to form a moderately stiff dough. Knead the dough until smooth {by hand or with a KitchenAid dough hook}.  Roll the dough into the size and shape of your baking pan. Spread half of the butter onto the bottom of the pan and then place the dough into the pan. Allow dough to raise in a warm place for 15 minutes then spread the remaining butter on the top of the dough. Top dough with bacon crumbles and cheese.  You can also add garlic powder and salt and pepper to taste.  Bake at 350°F for 20-25 or until golden brown. Cut into breadsticks and serve with your favorite marinara sauce {I’ll have to share my favorite marinara sauce recipe with you later.  Don’t let me forget!}.


Is it just me or do these not look amazing?  And another thing, why hasn’t Papa Johns or Pizza Hut thought of these before me?  I’m quite positive I’m on to something amazing and maybe they’ll take my idea and give me free pizza for life! …on second thought, maybe that’s not such a good thing to hope for.


No matter if you use my recipe or not, you absolutely must try and make Cheesy Bacon Breadsticks.  They are so good!  Don’t forget to shop Bi-Lo for a wonderful selection of fine bacon products at an affordable price!


Do you have a favorite dish you’ve added bacon to to make it even better?

Ring in the New Year with Health Essentials #Moms4JNJConsumer

This post is part of the HEALTHY ESSENTIALS® 2014 program by Johnson & Johnson Consumer Companies, Inc. and The Motherhood, who sent me a box of products and compensated me for my time. Opinions, experiences and photos shared here are all my own, and I hope you enjoy them.
Healthy Essentials

Save Money

You can get significant savings from HEALTHY ESSENTIALS® this Month!

To help families have a healthy New Year, HEALTHY ESSENTIALS® is offering amazing printable coupons, tools & tips and more!  We’re talking serious savings on products you’re already using.  You can save over $45 by visiting www.HealthyEssentials.com in January and signing up for extra-special HEALTHY ESSENTIALS® coupons and offers.

Twitter Party

Ring in the New Year with Healthy Essentials at the #Moms4JNJConsumer Twitter Party.  I am excited to join Johnson & Johnson Family of Consumer Companies for a Twitter party to talk about HEALTHY ESSENTIALS® for the New Year, resolutions, family wellness and how to score great deals on health and hygiene products! Come join us and learn how HEALTHY ESSENTIALS® can help you reach your health-related goals for 2014.

When: Tuesday, January 14, 1 p.m. ET

Hashtag: #Moms4JNJConsumer

Prizes: Throughout the party, 15 prizes will randomly be awarded to party-goers who answer the trivia questions correctly.  Each prize includes an assortment of Johnson & Johnson Family of Consumer Companies HEALTHY ESSENTIALS® products with an estimated retail value of $50.

Prize Eligibility: No purchase necessary. Entrants must be legal residents of the 50 United States + D.C. 18 years of age or older. Void where prohibited.

Hosts: @theMotherhood, @CooperMunroe, @EmilyMcKhann, @TheMotherhood25, & @Beauty4Moms (that’s me!)

Giveaway

Do you want to go to 2014 FIFA World Cup Brazil™?   I don’t know about you but I would like too!  Visit HealthyEssentials.com and just maybe your wish could come true.

All you have to do is share a picture or story of a moment of caring in your life and you could scream “GOAL!” from Brazil.

Visit www.healthyessentials.com for more information on this amazing opportunity and don’t forget about the fun Twitter party tomorrow.  I hope to see you there!

Pregnant and Pretty: Maternity Jeans for Moms to Be

This compensated post was written by our guest contributor, Sophie West.  She has a passion for women’s fashion and enjoys blogging about great looks for every stage of life.

Maternity Pose

Designers have created a fabulous range of maternity jeans that allow you to go through your entire pregnancy in comfort and style without having to resort to baggy tracksuit bottoms during the final months. Every possible cut and style is available from skinny jeans to flares and all include an elasticated waistband that will accommodate your growing belly. There are a few different types of maternity jeans, and some are designed to stretch over your belly whilst others will sit just below it. The style you pick depends on your own personal taste, and whatever waistband you find to be the most comfortable during your pregnancy.

Do I Need Maternity Jeans?

During the first stages of pregnancy you may be able to extend the life of your regular jeans by purchasing a maternity band. This works by attaching to the waistband of your regular jeans and holds them up so you can leave the button and zip undone. This is an ideal option for the early stages of pregnancy, but as your body grows in other places such as your hips and thighs you may find that you need some extra room. Many women are tempted to purchase regular jeans in large sizes instead of maternity jeans, but these will sag around the seat and will not be able to fit comfortably around your new shape. After the first few months, maternity jeans will be the best option as they are specially cut to fit snugly through the legs and hips whilst leaving plenty of space for your bump.

What Style Is Best?

Bootcut jeans are a fabulous option as they flatter every figure and are easy to dress up or down depending on the occasion. Skinny jeans can be worn during the first half of pregnancy or if your bump is relatively small, but wearing them with a huge belly will make you resemble a lollipop. Three-quarter length jeans are a nice option for summer and can be worn with flip-flops and a flowing tunic for a casual look.

What Are The Different Types Of Maternity Jeans?

Maternity jeans come with many different waist bands, and it is best to try all the options to decide which is the most comfortable for you. A stretchy, elasticated band made from either jersey, lycra or spandex is attached to the top of the jeans and will stretch with your body as it grows during your pregnancy. The most popular type of band can be stretched over your entire bump providing the most coverage, and this is usually the most comfortable method. Another type of band is designed to sit underneath your belly and has a reinforced elastic rubber band built-in to stop the jeans from slipping down. The third option can be rolled over your bump or left underneath your belly depending on the level of cover you prefer. Maternity jeans feature either a button and zip or a drawstring at the front to close them.

How Do I Know Which Size to Choose?

Maternity jeans are sized in the same way as regular jeans therefore if you were a size 12 before pregnancy then chances are you will need the same size in maternity clothes. However, if you have gained a lot of weight around your hips and thighs then you may need a larger size. The elasticated bands are also available in different sizes, so it is important to measure your waist and refer to the manufacturers size chart to find your perfect fit.

Most maternity jeans are made from a lightweight denim that is blended with some form of stretchy material such as elastane for added comfort. Whilst dark colors such as navy blue and black are traditionally seen as more slimming, this does not mean that you cannot experiment with a range of different colors. Pastel shades such as baby pinks and lemons are preferable to bright neon colors, and team these with some super-comfy Uggs or tennis shoes. Whatever styles you preferred before pregnancy such as ripped or faded denim and diamante details are all available in maternity versions, and the wide range of different options allow you to dress your baby bump in style without having to sacrifice your personal comfort.