Awkward Moments

I read a post over a year ago that listed awkward and awesome things together.  This idea has stuck in my head for a while and I’m finally writing my version of the post…well, two posts actually.  I’m breaking mine up into two posts so check back tomorrow for the “Awesome” segment.  By the way, I can’t seem to locate the origin of the post so if you know please let me know and I’ll add the link here.

Now, on to the awkwardness…

Awkward Moments:

When I’m out with my husband and I run into someone I know but for the life of me can’t remember their name.  It’s awkward to try and introduce them because the harder I try to think of their name the more my brain turns to mush.  When possible I’ll try to walk up, hug them, and say, “Hi!  How in the world have you been?”  Then standing with them I’ll turn and say, “Have you met my husband?”  That’s my husband’s cue to introduce himself  and then my unnamed friend will reciprocate and save me from unwanted embarrassment.

Getting caught taking a drink from my toddler’s cup in public.  Sometimes a girl’s thirsty and there’s nothing else around!

Leaving an answering machine message {are they still called that?} … and then giving out the wrong cell number. Well, at least half of it. “uhhh. No, I mean…here’s my other…”  I’m a real professional.

Not realizing that I have walked out of the house and into the grocery store with my slippers on.  Thankfully they weren’t the big fluffy bunny ones but were just the cute flip-flop ones instead!

Walking over to tell someone something important, waiting patiently for them to finish their current conversation, then when it’s my turn to speak, my mind goes blank.  “Your hair looks lovely today.  Yep, I just walked over here to tell you that.”

My husband pointing out an embarrassing typo in a blog post hoooouuurs after it was published.

Realizing in the evening that I went the entire day with a huge chunk of hair that didn’t make it into my pony tail. {#SportingaRatTail}

Walking into a spider web that no one else sees.

I’ll end with this awkward photo I took while trying to see what my hair looks like from behind.  Why can’t I just invest in a $1 mirror like a normal person?  I get embarrassed at myself every time I do this.

Back of Hair

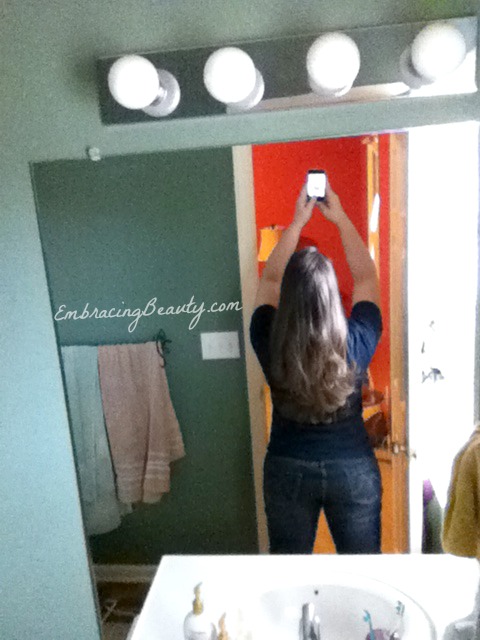
{Know that the posting this photo is a demonstration of the love I have for you, my dear readers.}

What awkward moments are you brave enough to share?

Are Anti-Aging Skin Products Effective?

Anti-aging Oil

Aging is something that all of us would avoid if possible and the many anti-aging treatment products on the market are a mute testament to that fact. Unfortunately, many of these products are very expensive so it is always a good idea to look into them before making a purchase. Many women (and men) considering using anti-aging products are looking for a specific effect, so it is also important to look into how well these products work.

Firming and Anti-Wrinkle Creams

Firming and Anti-Wrinkle creams are among the most expensive drugstore anti-aging skin products. These products range in function and title and are often labelled ‘anti-aging cream’ ‘anti-wrinkle cream’ ‘firming cream’ ‘anti-aging lotion’ or etc. Some of the most popular makers include L’Oreal and Olay, although there are literally hundreds of brands. Many also offer different functions so it is always important to look into them. Another consideration is that some are more effective than others. Typically anti-wrinkle creams use collagen fillers, antioxidants and a combination of chemicals and sometimes biological silicone to help firm skin and fill in lines and wrinkles. The down sides include that these treatments are only effective over long term use and the effects will fade after the creams stop being used.

Peels and Dermabrasion

Another anti-aging treatment popular on the market is peels and dermabrasion. Both of these methods use the idea that peeling or stripping away dead skin on the face will result in a younger fresher look. In both cases the effects are real, but can have some downsides as well. Chemical peels which can be applied at home can be effective but can damage the skin over time. Microdermabrasion which is usually done a studio can also be effective, but it can be expensive and effects do fade quickly if you do not take care of your skin afterwards.

Fillers

Fillers include dermal fillers and chemicals, but both are intended to fill lines and wrinkles so that you look younger. Popular options include Juvaderm which is a type of plastic filler. Hylaform is another popular option, it is also filler but is sometimes available in moisturizers so that rather than being injected into the skin, it is built up in lines and wrinkles over time to reduce the size. These fillers can create good looking results but are quite unnatural and can cause complications over time.

Prolonging and Improving Results

Each of these anti-aging treatment options has one major flaw. They often lose effect if not kept up or simply cover problems rather than repairing them. Many dermatologists today are now recommending laser skin rejuvenation as an alternate choice, as well as a method to prolong the effects of creams and dermabrasion.  A facial rejuvenation laser works by targeting skin cells to stimulate collagen growth and improve elasticity. On its own, laser rejuvenation can reduce fine lines and wrinkles, help to improve pigmentation, help to improve conditions including scarring, vascular problems and help to improve skin tone. Importantly, laser skin rejuvenation can be done in a studio, but there also devices that you can use at home to receive the same results over time.

Choosing anti-aging treatment options is up to you, but in any case it is always important to combine your treatments with a moisturizer. Applying moisturizing lotion or creams to the face and hands immediately after showering allows the skin to absorb more of the moisturizer.  Choosing healthy foods, eating or taking antioxidants and avoiding skin damaging lifestyle choices such as smoking can also help to improve the health of your skin so that you look younger.

Suzie Marsh, the author of this post, is a writer who understands that the demand on anti-aging treatments to keep us looking younger has increased dramatically. This demand has led to innovations in anti-wrinkle creams and cosmetic procedures.

Pretty Wicked Moms and “Me” Time

FTC Disclosure Requirement: EmbracingBeauty.com aims to provide unbiased editorials. However, I wish to disclose that from time to time I may receive free products or other compensation from companies for blogger reviews.

Mother and Daughter Reading

The job of a mom may be the hardest job in the world.  Moms have dozens and dozens of responsibilities, many of which aren’t seen by the naked eye.  Juggling everything day in and day out can leave you feeling overwhelmed and numb to the outside world.  When this continues without breaks of  “me” time it can be disastrous for your emotions and wreck havoc on your friendships and even your marriage.

Me time can be waking up early before your family to get your head clear and everything prepped for the day.  It could be planned quiet times while the kids play quietly in their rooms so you can refocus and regroup.  Whatever it is, it needs to be an essential part of every mom’s day or at least week!  {Check out 10 Ways to Pamper Yourself in 10 Minutes}

To stay sane I try and schedule two small blocks of me time every day where I’ll read my Bible for the first block of time and I’ll catch up on social media or read for the second.  Just about once a week I’ll spend time working on a new nail art design to show you.  Most people would think that attempting nail art would be frustrating and nerve-wracking and anything but a relaxing endeavor but for me it’s a fun, relaxing hobby.  It’s important for everyone to find something that they enjoy and that relaxes them.

Have you heard about a new series starting called Pretty Wicked Moms?  It will air on Tuesday, June 4, at 10:00 pm EST on Lifetime.  I’m excited to tune in and see what all the hype is about.  It’ll be interesting to see what all topics they’ll cover but I’d bet a lot that the topic of me time comes up at least a time or two.  Take a little me time of your own and tune in with me on June 4th to see what Pretty Wicked Moms is like and check out this brief preview below:
 

Make Up Tips to Hide Allergy Symptoms

Make Up Tips to Hide Allergy Symptoms

It’s beginning!  Allergy season is coming full force!  It’s the time for sneezing, itchy eyes, irritating cough, congestion, and watery eyes.  Pollen is bombarding us daily, outdoor mold is releasing airborne spores, and then there’s grass.  Oh, the grass!  How is a girl to handle these allergy symptoms and ward off that “Are you coming down with something?” look?  I have some ideas that will take just a few extra steps every morning and will combat and conceal allergy symptoms.  These Mary Kay products will keep you from looking as bad as you feel!

Disclosure: I was given several Mary Kay products to review if I chose to and because I love these four products here is my review.  These are 100% my thoughts and no compensation was provided.

– To distract from watery eyes and a red nose:

 Mary Kay Concealer

  • – Apply Mary Kay Concealer under the eyes to diminish dark under-eye circles and under the nose to conceal red irritation.  This fabulous concealer comes in six natural shades plus yellow (which is amazing at reducing the appearance of red in the skin tone).  I’ve used a lot of concealers and this is one of my favorites!

Mary Kay Facial Highlighting Pen

  •  – Use Mary Kay Facial Highlighting Pen on the top of cheekbones and the inner corner of the eyes to brighten the face.  This product is amazing!  I used this product from Mary Kay a few years back and it wasn’t nearly as great as it is now.  They must have improved the formula and I’m sure glad they did!  This pen includes special light-reflecting pigments that optically “lift” the shadowy areas of your face.  The Highlighting Pen comes in four different shades.

 – To relieve discomfort:

Mary Kay Volufirm Eye Renewal Cream

  • – Soothe puffy eyes with Mary Kay TimeWise Repair Eye Renewal Cream. This cream is designed to reduces dark circles, puffiness, and undereye bags.  What’s not to love?  The unique metal applicator is cool to the touch which not only feels great when applying the cream but it also helps reduce puffiness and provide a fresh look.

Mary Kay Moisture Renewing Gel Mask

  • – Combat dryness and brighten your complexion with Mary Kay Moisture-Renewing Gel Mask.  I absolutely adore this mask.  I’ve never only used it for 10 minutes and washed it off like one of the suggested uses says but instead I opt for the second suggested use and leave it on overnight for a “pampering experience.”  Seriously, this stuff is good!  It’s a tremendous moisturizer without the weight you would expect from a heavy-duty moisturizer.  The first time I put it on it was hard to quit, I put it all over my face, my neck, around my eyes, then back on the rest of my face.  This will be a product I plan on buying as long as they’ll keep making it.

This mask contains a potent blend of vital skincare essentials, including moisture-loving Sodium Hyaluronate, Vitamin E and B3, and an extract of the super-fruit Acai Berry.  This helps skin feel calm and nourished.

I have extremely dry eyes year round {so much so that I have tear-duct plugs and use two different drops multiple times a day!} but when allergy season hits, with it’s merciless force, my eyes are red, itchy, and DRY!  Because of my eye dryness I’m much more prone to get wrinkles around my eyes so it’s important for me to use a great eye moisturizer day AND night.  I take every precaution to avoid wrinkles by keeping my eyes moisturized, by using glasses when reading to avoid squinting, by gently applying and removing eye make-up and skin care products, and to use an eye treatment product at night.  Because this is such a tremendous moisturizer I plan on using it nightly around my eyes in place of the more expensive eye creams that are available.  If you have dry eyes, or allergies that affect your eyes, this is a product I think you will enjoy.

By the way, I apologize for the quality of this picture!  Because I use this at night, every night, I could never remember to take a picture of it during the day.

While it’s possible to buy Mary Kay products on Amazon and eBay I recommend buying them through a local independent beauty consultant that way you can support a local business and you can trust that the product isn’t outdated or hasn’t been tampered with.

A Simple Way to Encourage Fellow Moms

I participated in a campaign on behalf of Mom Central Consulting for Johnson’s Baby.  I received a promotional item as a thank you for participating.

Motherhood is probably one of my biggest accomplishments but it’s undoubtedly my most exhausting job.  I’m constantly being questioned from others about the choices I make as a mother.  Whether or not I swaddled, what formula I used, whether I washed my girl’s clothes before she wore them {I choose to but my family doesn’t understand the need}, and most recently because I don’t let my daughter play on the steps by herself {She’s not physically capable of coming down them in any way without falling so I let her go up them when I’m behind her but that’s it.  We practice going down them but I’m not going to let her play on them alone.  I let her fall and make mistakes but not when it could involve her breaking her neck.  I don’t apologize for that!  Sorry for the rant, can you tell it bothers me when people insert their unwanted comments?}  With all the critical comments from others it’s probably hard to believe that I’m my biggest critic but it’s true.  I worry about her fine motor skills, gross motor skills, social development, potty training!, the variety of food she eats, that I’m training her properly, and the list goes on and on.  My mind is constantly a jumble of things to do and check up on.

Mommy and baby

Occasionally another mom will look at me and give me an encouraging look.  It’s as if, without words she’s saying, “I’ve been there.  It’s okay, you’ll make it through this.”  I’ve had a few moms I know give me incredible words of encouragement that have lifted my spirits far above what words could describe.

While I’m only a few years into this motherhood journey I want to be like those mother’s who have encouraged me.  I want to make a conscious effort to go out of my way to encourage new mothers. To tell them that they are wonderful and are fabulous mommies.  To tell them they look beautiful on days when they look a little disheveled.

I was excited to recently discover that Johnson’s has a great new promotion, it’s called Johnson’s Baby “Care Cards.”  It’s an easy way to share encouraging messages to moms no matter where they live.  Every mom has questioned whether they’re doing a good job or not {at least, I hope I’m not the only one!} and it’s important to tell them that they’re doing a good job.

Johnsons Baby Cares

You can join Johnson’s Baby “Care Cards” by creating and sending a digital Care Card to send to a special mom in your life on Facebook.  You can send a card to your mom, grandmother, fellow moms, new moms, and well, any mom!  Here’s the icing on the cake, for every card sent, liked, or shared Johnson’s Baby will donate $1 to Save the Chiildren, up to $150,000, to benefit early childhood education.  Isn’t that great?  They’re close to $100,000 now so there is still $50,000 left to raise.  Get sharing!  This is a great way to encourage someone you care about while also supporting those in need.  Through Johnson’s support of Save the Children’s Early Steps to School Success program, they are helping to provide moms with the skills and knowledge to successfully support their child’s growth from pregnancy until school age.

Every mom

To every single mom who is reading this, please know that you are enough.  You are a great mom!  As Mr. Fred Rogers said, “You are special just the way you are!”  Don’t let other people’s comments ever get you down.  They haven’t been where you are.  Some days are longer than others but on those days try to keep the big picture in mind and remember that one day you’ll look back and wish you could relive these days.

Happy Belated Mother’s Day!!!

Earn Cash with Qmee by Searching Online

This is a sponsored post written on behalf of Qmee. While I was compensated for this post, the thoughts and opinions expressed in this post are completely my own and I was already a fan of Qmee before I was contacted to write this post.

If you’re like me you like to add all the change to your bank account that you can.  Am I right?  What if I told you that you could add a little extra change each month by doing what you are already doing?  You would be a little skeptical and I don’t blame you!  I was in your shoes a few months ago when a blogging friend told me about this exact same thing.

If you ever use a search engine this is for you!  Qmee.com has a program that allows you to rake in change just by clicking on their links in your search results.  Unlike other similar search engine services you don’t get points that you can redeem for other items, Qmee gives you cold hard cash!  Well, change really but it adds up to cash.  Also, unlike other services that require you to go to their site to search and then they replace your search results entirely Qmee comes along side your search results.  That’s right, no matter if you’re searching on Google or Bing or Yahoo…Qmee brings an additional few options to click on to the left of your screen.  If you choose not to click on one of their links, no harm.  If you choose to click on one of their links you’ll make a little money.  The results even have beneath them how much you’ll make from clicking each link.  Talk about transparency!

I use Chrome because it’s my absolute favorite browser but I’ll save those reasons for another day.  On Chrome I had the option of adding the Qmee app/plugin to my Chrome toolbar.  It took just a few seconds to join and I’ve been making steady money every month since.  Not a second income, mind you, but a few dollars.

Here’s an example where I could have earned $0.06 when I searched for Toddler Clothes {my little one really needs summer clothes!}.  You can see that it shows my Google results to the right and the Qmee results to the left.  Neat and tidy and not intrusive at all.  {You can also see that I’ve been to Zulily lately! I truly love them!}

Qmee

If you want to check how much money you’ve accumulated in your Qmee piggybank you can visit Qmee.com and log into your account or you quickly click on the Qmee Q in your toolbar and see your piggybank balance that way.

If you’re a charitable person and would rather donate your earnings to a charity you can do so simply online without having to withdraw your money and write a check to donate.  They make it simple for you!  There is a long list of charities you can chose from but if your favorite charity isn’t on the list you can reach out to them to see if they can work on adding that charity.

Oh, there is one more thing!  You will need a Paypal account in order to get paid…unless you decide to donate your earnings.  I think that’s it!  Qmee is still pretty new and is in Beta mode so you’ll need an invite to join.  Lucky for you, you know a fabulous blogger who has a whole bunch of Qmee invites to hand out!  These invites are available on a first come, first serve basis but don’t worry if you don’t get one you can request to join and they’ll send you an invite when they have them available.

Sign up for Qmee Beta.

If you’ve already signed up, please leave me a comment below to tell others what you think of it!

Party With Dunkin’ Donuts New Limited Edition Flavors!

I participated in a campaign on behalf of Mom Central Consulting for Dunkin’ Donuts. I received a Dunkin’ Donuts Party Kit to facilitate my review and a promotional item as a thank you for participating.

New Dunkin Donut Flavors

I have always liked coffee, well, at least since I was 8 years old that is.  I’ve tried a lot of different brands and while I like to switch it up a bit, Dunkin Donuts has been a top favorite for a long time.  A co-worker introduced it to me when he bought coffee for the coffee maker I kept in my office that he often snuck coffee from.  I’ve loved it ever since!  Recently though, I’ve been introduced to Dunkin’ Donuts new seasonal flavors.  This line includes Cocnut, Triple Berry, and Strawberry Shortcake.  While I was a little leery to try the Coconut one I was anxious to try the other too.

Dunkin Donuts Party

Mom Central and Dunkin Donuts sent me everything I needed to host a fabulous coffee party!  I got a bag of all three new flavors and goodie bags filled with coffee, tumblers, and coupons for all the guests.  I decided to have a afternoon coffee party with the people who taught me to love coffee and a girlfriend of mine too.

Dunkin Donuts

It was a cool day that wasn’t too hot or too cold so it was perfect to enjoy both hot coffee and iced coffee.  We had to buy a coffee filter so I could use these coffees with my Keurig.  I even had a mini-party with my parents when they came down to visit the following week.  This coffee is too good not to share!  Everyone agreed that these flavors were delicious.  I even liked the Coconut!  My favorite though was the Strawberry Shortcake and it was just perfect with a dash of Sweet Cream creamer.

I love a hot {or truthfully a warm} cup of coffee in the morning and iced coffee in the evening.  Iced coffee just gets me in the mood for summer!

Do you love iced coffee?   If so give this Dunkin’ Donuts Iced Coffee Recipe below a try.  It’s yummy!

Dunkin’ Donuts Iced Coffee Recipe
Prep time:  
Total time:  
Serves: 4
Ingredients:
  • ¾ cup of your favorite ground Dunkin’ Donuts Coffee
  • 3 cups cold water, divided
  • ⅓ cup sugar
  • ½ cup half-and-half
  • Whipped cream (optional but definitely a good thing to add!)
Instructions:
  1. Brew coffee in coffee maker using ¾ cup ground coffee and 1½ cups cold water.
  2. Combine hot brewed coffee, sugar and half-and-half in pitcher. Stir until sugar is completely dissolved. Blend in 1½ cups cold water. Chill until ready to serve.
  3. Pour over ice in tall glasses or cafe mugs. Top with whipped cream, if desired. Serve immediately.

Check out Dunkin’ Donuts new seasonal flavors available in grocery stores while they’re still available!

Disney Mickey and Minnie Nail Art

Mickey and Minnie Nail Art

Minnie Mouse is one of my favorite Disney characters!  She’s adorable for little girls and grown up girls too!  I love her sweet face, her relationship with the mouse who started it all, Mickey, and her love of polka dots.  What’s not to like?

If you follow me on Pinterest {and I hope you all do!} you’ve been bombarded with my Minnie Mouse pins lately.  I’m sorry about that!  You see, my little girl is about to turn two and I’m searching for every idea possible to make her Minnie Mouse party a success.  {Check out my DIY Minnie Mouse Halloween costume I made her.}  While browsing and browsing I found quite a few cute Minnie Mouse nail designs {which I pinned on my Pretty Nails board}.  Some were simple and some were far above my skill level.  I chose to do a design that was right in the middle.  It stretched me out of my comfort zone and I’m very pleased with the results.  If you think these are awful, please keep your comments to yourself.  Don’t bust my bubble!

My favorite Mickey and Minnie images are from the 70’s and 80’s.  Do you remember the ones?  Minnie wore a blue dress, yellow shoes, and a hat with a flower in it?  I tried to make my characters look like the ones from back then except that Minnie has a bow instead of a hat.

Have you ever done your own Mickey and Minnie Mouse Nail Art?  If so, I would love to see it!

Products Used:

Here is a list of the products that I used for my Mickey and Minnie Mouse Design:

  • – Julep Polish in a beautiful shade that isn’t available yet….that I got to name!!!  I can finally cross that item off of my bucket list.  This color will be making it’s debut soon.  Don’t you want to buy it?  I think it’s absolutely beautiful!  My poor photography skills make it look a little darker in the picture than it actually is but don’t you love the rose gold flecks in it?  Even if I didn’t have the privilege of picking the color and naming it myself it would still be my favorite polish.
  • White Nail Art Paint (Milani)
  • Dotting Tool
  • Black Polish (Sally Hansen)
  • Base and Top Coat (Julep Base Coat, Julep Polymer Top Coat)

I’m sorry that this isn’t a tutorial post but I don’t think I could do it again if I tried!  I set aside a block of time, figured out what I wanted my design to be, and carefully applied each stroke.  Sometimes I used my dotting tool or my fingernail to remove a little paint if I went a little too far.  After I was happy with my design I sealed it off with a top coat.

Even though this isn’t a tutorial, I would be happy to do my best to try and answer any questions you might have so please feel free to leave them in the comments below.  Plus, feel free to leave a comment here telling Julep what you think of their new polish color!

Aflac Real Cost Calculator

*This post has been sponsored by Mom Central Consulting and Aflac but all opinions remain my own. Full disclosure is at the bottom of the post.

Aflac Logo I’ll be honest, paperwork confuses me.  I have to set aside time to focus, read, and reread information before I can comprehend it.  Any paperwork over two or three pages is overwhelming to me.  School loans {thankfully paid off!}, a will {which we have to sit down and read over our draft before we make it official}, retirement choices, any type of medical or insurance paperwork.  I understand all of these things in theory but instead of just assuming I’m making the right choices and winging it I want to slow down and carefully consider everything.  I don’t want to cross my fingers and hope that I my husband has enough money to retire one day, or that he’ll have enough money if I happen to pass away, or that I’ll have the insurance or savings built up to cover an emergency.  I enjoy being prepared…even if that takes a lot of effort on my part.

Some expenses people incur are obvious ones, ones that should have been planned for.  Wedding anniversaries come once a year, I can’t for the life of me understand why people don’t save money for them or add them to their budget instead of charging an expensive gift.  Of course buying a gift they can afford or making a homemade gift would be great too.  School clothes and supplies are a hassle every year….every year.  Devise a plan to pay for them instead of paying off your credit card till Christmas when you’ll pile on more debt.  It just makes sense to me!

With medical expenses, things are less black and white.  You never know when an emergency will arise.  You have to consider your family’s health and bank account and weigh the options.  Do you have the money in savings to cover $X amount of bills?  Would you rather pay for someone else to cover your costs in the event something were to happen?  Everyone’s situation is unique.

Hospital pic

This time last year I was in the hospital and it was totally unexpected.  I went to the doctor to complain about a pain I was having and ended up spending days in the hospital.  I had a follow up visit to remove a pump they put in.  Then I had surgery a few weeks later.  Again, I had more follow up visits.  These were definitely some unexpected medical costs!

I’ve seen some dear friends and family really come close to losing everything after an unexpected medical emergency.  Even with medical insurance the out of pocket costs added up quickly.

The Aflac Real Cost Calculator is a great tool that can help you break down the expenses of medical care.  I spent some time playing around with the different scenarios and the numbers were crazy!  A broken leg seems like a common procedure but it costs over $10,000!

I heard somewhere that medical debt is the number one cause of bankruptcy and I would have to agree with that.  If people have planned ahead and had a savings account built up then I would say skip the insurance but if they don’t, Aflac insurance might be a good safety net to have.  Aflac helps offset the out of pocket cost of medical bills.  If you’re interested in getting this extra safety net for your family check our the Aflac Real Cost Calculator for yourself.

I participated in a campaign on behalf of Mom Central Consulting for Aflac. I received a promotional item as a thank you for participating.

Puzzle Nail Art Tutorial

DIY Puzzle Nail Art

Last month, I told you about my puzzle nail art and how I created it.  I was excited about my puzzle nails and I’m glad to know that you liked them too!  I’ve received numerous comments and emails requesting pictures to show the tutorial step by step so I’m here to hopefully visually explain with pictures what I tried to explain with words before.  I hope this helps clear any confusion but as always, if you have any questions please feel free to contact me!

Here are a few simple steps that I think make for a great at home manicure:

  1. Trim, file, buff, & push back cuticles.  Buffing might seem like a waste of time but it will help your nail polish last longer!
  2. Apply a base coat.  Let dry.
  3. Apply your base color of choice.  I recommend starting with your lightest shade (even though I forgot to do this myself!).
  4. Allow to fully dry.  This could take a while so I usually add a quick drying top coat here so I can get to designing my nails (the fun stuff) right away.
  5. Apply tape and paint the remaining areas.
  6. If you’re doing the puzzle design that I did, take a dotting tool (or a toothpick) and dip it into the polish and then onto your nail on the  opposite color.  Repeat with each square.
  7. Apply a top coat.
  8. Take a picture and post it on Instagram with the tag #EmbracingBeauty so I can see it.  (Really, I want to see!)

Scissors and tape

One you’ve got your lightest color applied and fully dry cut two pieces of tape to use.

Color Blocking 101

Apply the two pieces of tape to your nail.  You want the two corners to meet in the middle and barely touch.  Make sure you use the smooth sides of the tape and not the ridged edge where you tore it off…unless you’re not doing puzzles and you’re going for that look.  Smooth the tape down with another finger nail to make sure there are no air pockets underneath where polish might seep.  Then carefully apply your darker color over your light one.  While your nail polish is still tacky and not fully dry begin sloooowly peeling the tape off.  Wait until your polish is fully dry before moving on to the next step.

Nail Polish Dotting

Grab your favorite dotting tool and bottle of polish.  I use the cheapo dotting tools from Amazon {and love them!} but be warned they take a few weeks to ship.  Right now they are selling for $1.86 shipped but the price could always change.  You could also use a toothpick or a mechanical pencil.  For this dotting technique I chose a wider end than I usually use.

Taking your brush from your bottle of polish dab some out on your work surface.  I always use the back of a magazine I have laying around.  Screw the lid on quickly and dip your dotting tool in the polish and then on your nail.  Don’t wait too long because the polish gets tacky and hard to work with when it’s drying.  Apply one dot of your darker color onto the square of the lighter color polish.  Repeat with the other light colored square.

Nail Tool Dotting

Repeat with your lighter color on top of your darker color.  As you can tell by this picture the paint is thick and bubbled up – that’s okay!  Once it’s dry it will be flat and look perfectly like a puzzle piece.  Just be careful not to touch your nails for a while because it will take a little longer to dry this way.  You can also add a top coat to help seal your manicure after your polish dries.

I think that’s it!  If you got a little polish on your fingers you can remove that with nail polish remover.  I find that an old art paint brush dipped into acetone works great for scrubbing off those pesky stray smudges of polish.

If you try out these puzzle nails I would love to see the results!  Please email them to me or share them on Instagram with the tag #EmbracingBeauty so I can see it.

Happy Painting!