6 Must Haves for Summer

Summer is in full swing and I am loving every minute of it!!  Besides a great book and some sunscreen here are five new items that I recommend to help you enjoy summer to it’s fullest…without sacrificing style of course.

Tarte LipSurgence Gloss

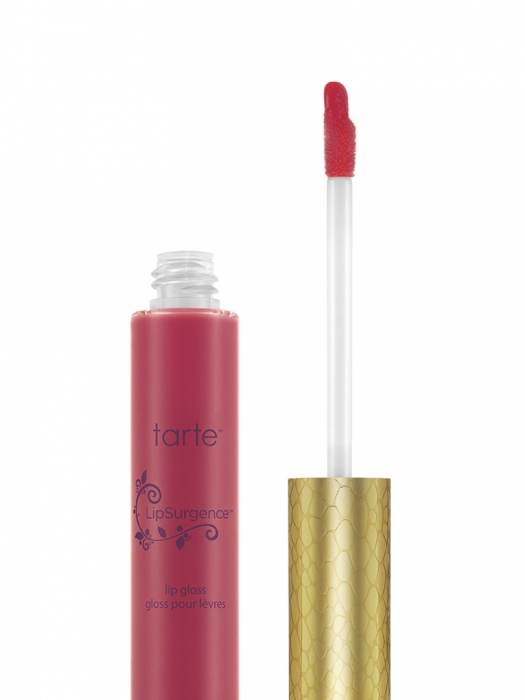
1. Tarte’s Limited Edition LipSurgence ($19)

This lip gloss (pictured in Envy) will keep your lips looking colorful and shiny all day.  I’m a huge fan of Tarte products and this new lip gloss is no exception.


Crabtree & Evelyn Nail Polish Almond

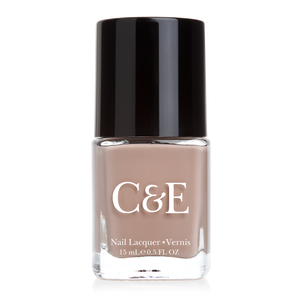
2. Crabtree & Evelyn’s Nail Lacquer. ($6)

I’m in love with this soft and simple shade named Almond.  Something about is so calming and feminine.


Sunglasses

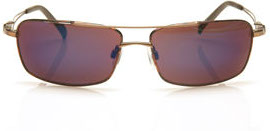
3. XG Sunglasses ($125-$145)

Protect your peepers with fashionable shades.  I’ve just ordered a pair of the Zurich sunglasses with “Extreme Glare” technology.  I’m excited to give them a try!

Vionic

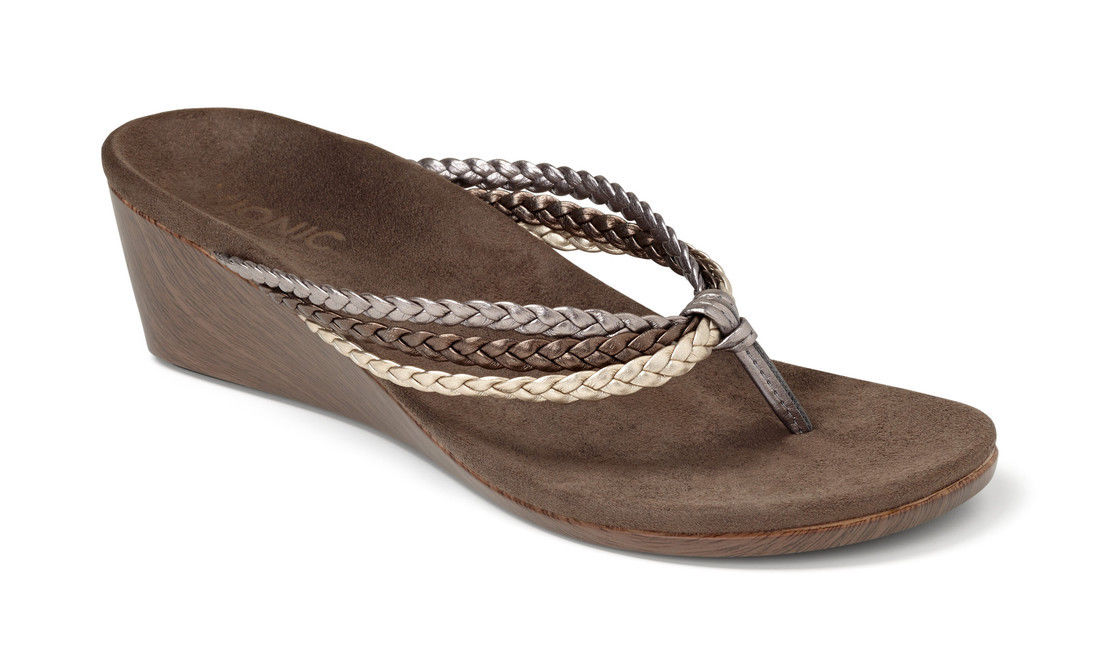
4. Vionic Sandals ($45+)

If you know me personally I’ve complained for years about how there needs to be a company who will invent a lightweight sandal that has arch support – well, a company did that!!!  A company called Vionic.  Clarks’ flip flops have support but they are on the heavy side.  Chacos are fabulous sandals but they’re not meant to be dressy in the least.  Vionic sandals are the solution!  They are as light as can be and they have fabulous support to help protect the most important curve of your body –  the arch of your foot.  I just discovered these this summer and I’ve already bought two pair.  They are a little costly but oh so worth it!! Trust me! (and they’re having a 30% off sale right now! Yay!)

J. Crew Shorts


U by Kotex

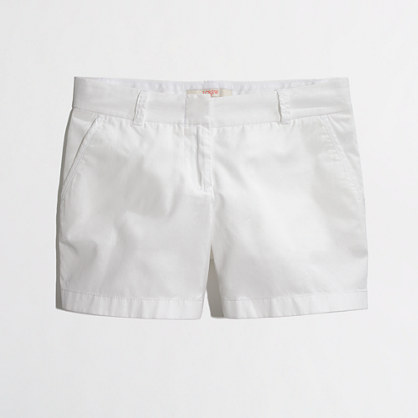
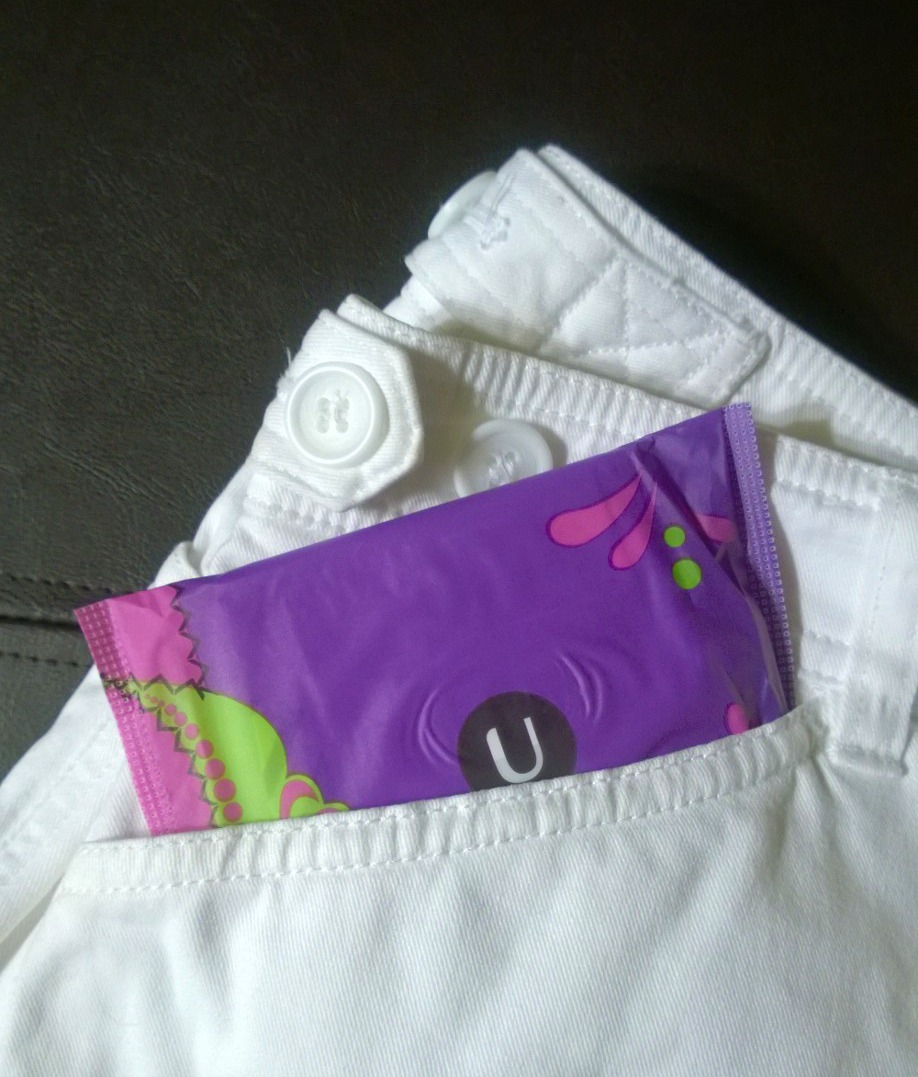
5. White Shorts ($24.50)

Okay, so white shorts aren’t new but I think everyone who walks should own at least one pair of white shorts during the summer.  White shorts can be a little intimidating for ladies during certain times of the month but have no fear, I know a new product from U by Kotex that will make white shorts wearable all summer long! U by Kotex pads w/ new 3D Capture Core has got your back…or should I say bottom?  Ha!  (Plus, while supplies last you can snag a free sample of U by Kotex Curve by clicking here. Oh and you can visit BringComfyBack.com and show your uncomfy face to enter to win BIG!)

By the way, the white shorts pictured above are from J. Crew Factory and are on sale for $24.50, from $39.50.

Jamberry Polka Dots

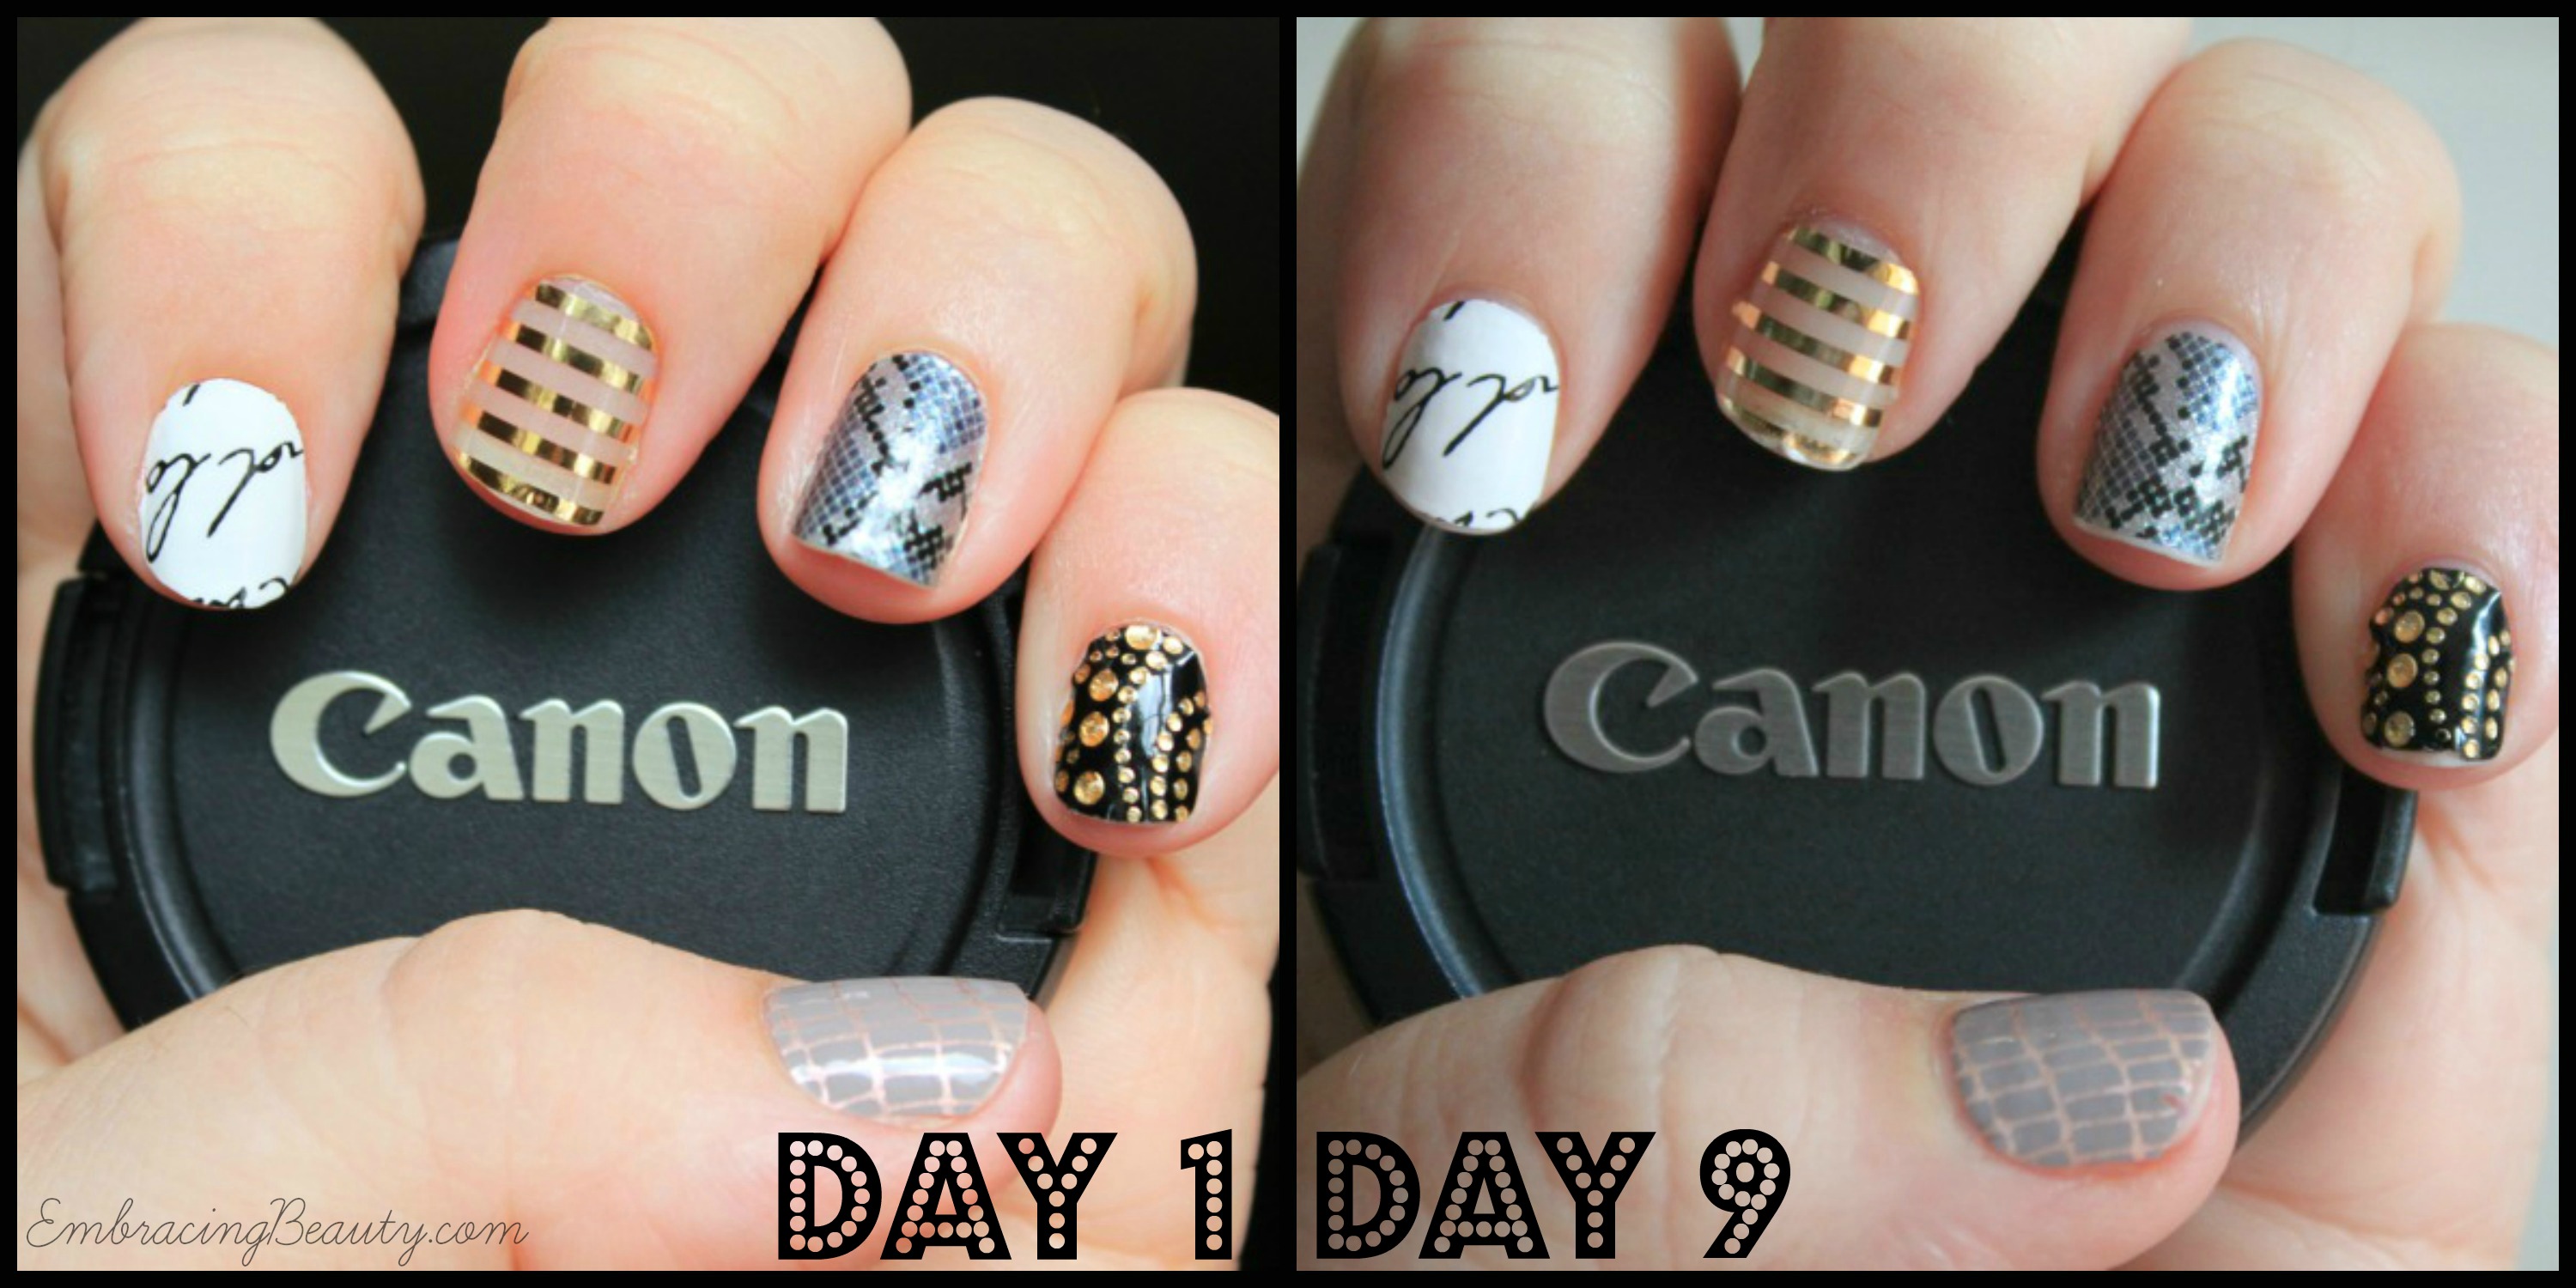
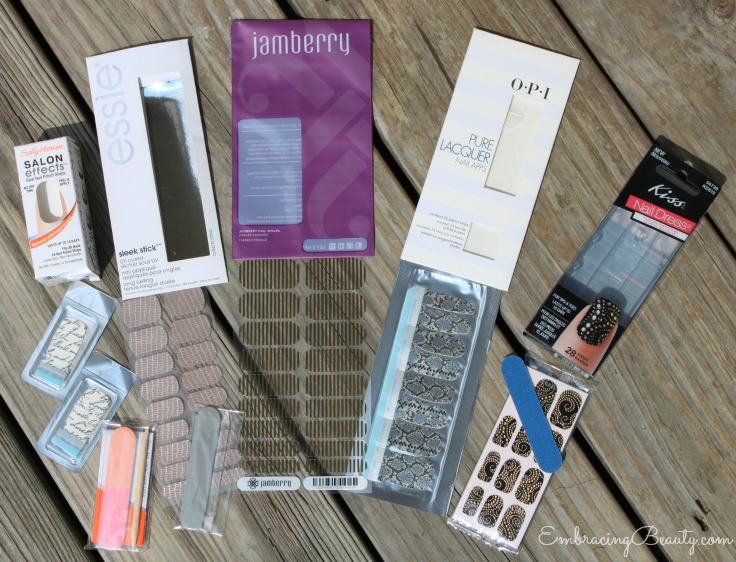
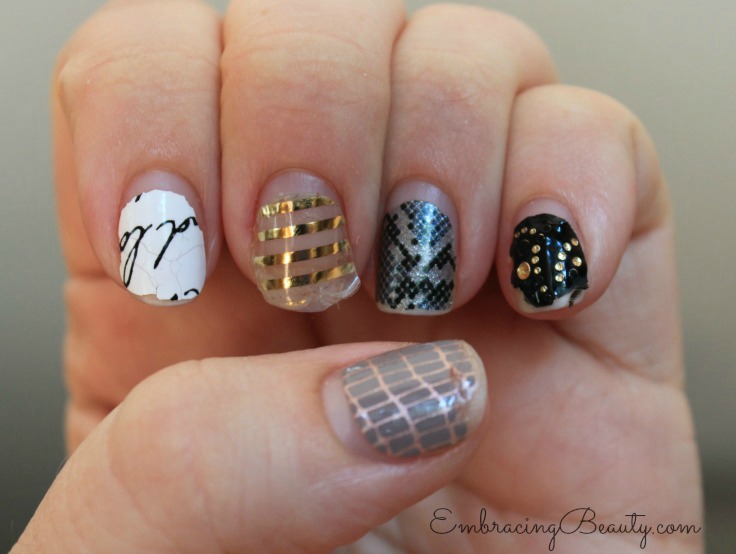
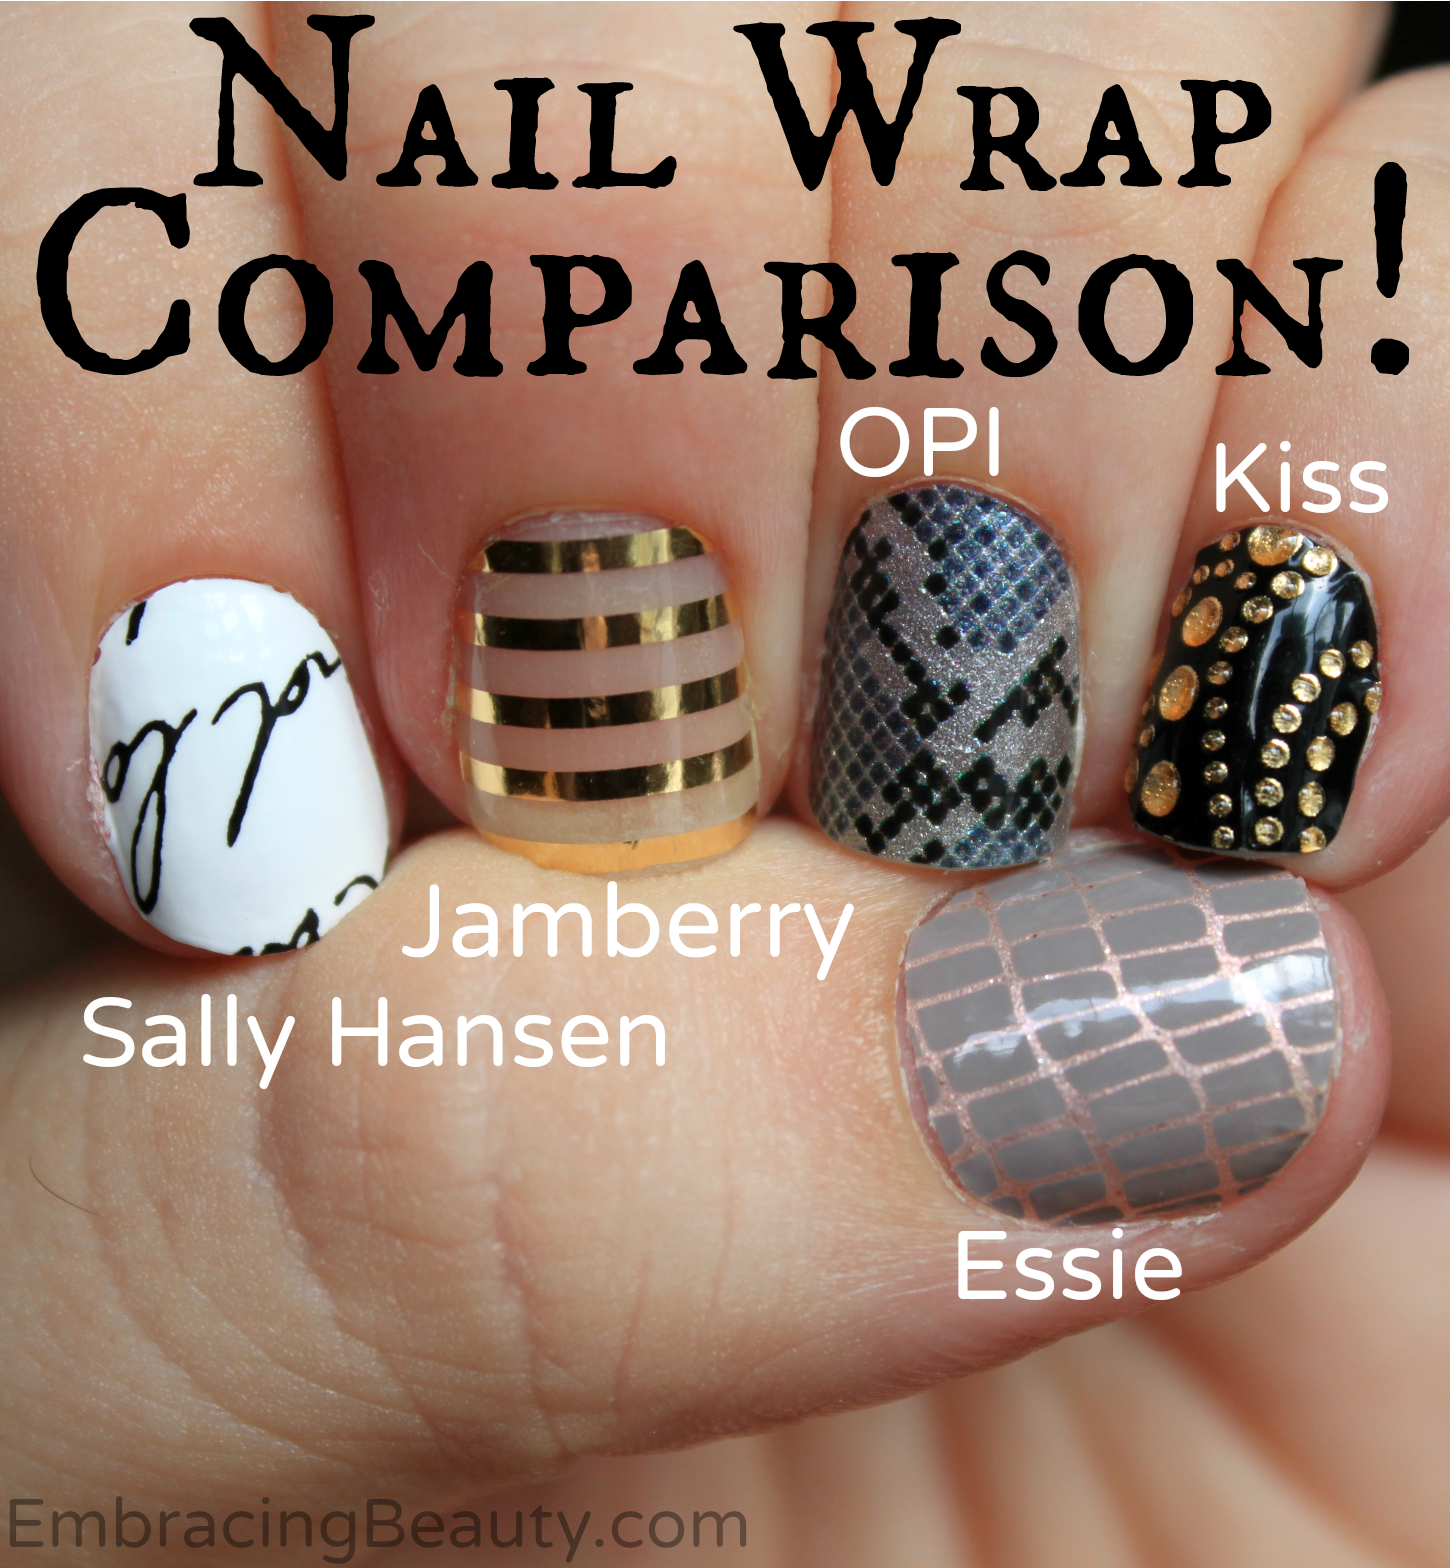
6. Jamberry Nail Wraps ($15)

Jamberry nail wraps are like stickers but with super holding power, that stay on your fingers for two weeks and your toes for four weeks.  These are just perfect for keeping a great mani while battling the surf or relaxing in the sun.  The color above is Icy Rose Polka.

JUST WAIT until Sept. 1st though!!!!  I have had an exclusive sneak peek at their newest TruShine gel polish and it is AMAZING!!!  I like Jamberry but I LOOOOOVE their gel polish.  In my opinion, every woman should own it (who wears polish at least).

What’s on your must-have fashion list this summer?

Nail Wraps Review – Sally Hansen, Jamberry + More

I’ve procrastinated writing this post for far too long because I spent weeks writing it in my head EVERY day.  I wanted this post to be perfectly detailed and totally unbiased.  I took detailed pictures every day.  Seriously.  I spent far too much time thinking, analyzing and worrying about this post….that I never wrote it.  As the old proverb goes, “Perfect is the enemy of good.”  Without further ado, here is my not perfect but hopefully helpful post.

Nail Wrap Comparison

As I said in my first post here, I’ll be judging them based on the following aspects:

  • – Style/design
  • – Ease of application
  • – Shape of wraps
  • – Cost
  • – East of removal
  • – Chemical components
  • – Durability

– Style/Design

I chose the designs that I personally liked so yes, I liked them all but allow me to go into a little more detail.

  • – Sally Hansen (white) – I love the script but due to the shaping of the wrap, which we’ll get to in a minute, I had to turn the wrap (and script) upside down.  I still like it though!
  • – Jamberry (gold) – I like this wrap because I can wear it on my bare nails or over top of another wrap or polish.  While I like the diversity of it, the stripes made it easy to tell if it wasn’t EXACTLY straight (and unfortunately it wasn’t).
  • – OPI (rattlesnake) – I adored this one!  The complexity of the colors and shimmer make it look much fancier in person than the picture captures.  When running your finger over the wrap you could even feel the snakeskin texture.
  • – Kiss (black) – I wasn’t a huge fan of this one to begin with, it’s a touch gaudy for my style but I did like it.  The 3D gemstones have a metallic look to them.
  • – Essie (grey) – This is another one that looks better in person.  The grey is a flat color while the pink behind it is fabulously shimmery.  This wrap is also textured.

Based on style/design my favorites are OPI & Essie.

Nail Wrap Brands

– Ease of Application

  • – Sally Hansen (white) – Came with orange stick and nail file.  Just peeled off and pressed on.  Easy peasy!!  After applying the nail wrap I used the enclosed nail file to remove the excess and it came off right away.  Very simple.  These wraps were very thin and were easy to stretch to get a good fit.
  • – Jamberry (gold) –  This package only came with the wraps themselves.  If you’ve ever tried Jamberry wraps before you know that it’s kind of a complicated system.  I’ll skip the details here and let you google those on your own but I’ll say that this wrap took the longest to apply.  I’ve used Jamberry wraps several times before this application so you’ll have to trust me, I did apply them correctly and took my time to make sure they were done right.  This was by far the hardest to apply but not so difficult that I wouldn’t do it again.  They were also the thickest wraps of the ones I reviewed.
  • – OPI (rattlesnake) –  Came with a small nail file.  This went on just like the Sally Hansen ones and were super thin and stretchy too.  Easy as could be.
  • – Kiss (black) –  Came with a nail file.  These wraps were slightly thicker than the Sally Hansen and OPI ones but not as thick as the Jamberry wraps.  The gemstones made it difficult to press the nail wrap down so it took more time than a few others but not as long as Jamberry.
  • – Essie (grey) – Came with a plastic orange stick and nail file.  These went on the same as the Sally Hansen and OPI wraps.  Very thin, stretchy, and quick and to apply.

Shape of Wraps

My nails naturally have a square-ish shape so my reviews are based on my personal experience.  If you have different shaped nails, I’m sure you’ll like different wraps.

  • – Sally Hansen (white) –  As I mentioned previously, I had to turn this wrap upside down to get a good fit and while I didn’t like that for this particular design I do love the fact that one side of the wrap was rounder and the other was more square.
  • – Jamberry (gold) –  Jamberry is the wrap that I had to cut the most.  They’re wraps are very round on all edges and that’s something I wish they would change.  However, they also had more wraps so I had more size options to search through to find ones that really fit from side to side.
  • – OPI (rattlesnake) –  This fit my nail the best!  It was like it was custom made for my nails.
  • – Kiss (black) – These also had one side that was square and one that was round.
  • – Essie (grey) –  These only had square sides but that worked in my favor.

Cost

I bought all of these from Amazon.com so I’ll add my Amazon affiliate links here and a link to my friend’s Jamberry site.

  • – Sally Hansen (white) – $7.13 w/ free shipping on Amazon.  Contains 16 strips.
  • – Jamberry (gold) – $15.00 on Jamberry.  Contains 18 strips.
  • – OPI (rattlesnake) – $12.99 on sale for $5.99 w/free shipping on Amazon.  Contains 16 strips.
  • – Kiss (black) – TWO pack for $15.00 + $2.95 shipping on Amazon.  Contains 28 strips per pack.
  • – Essie (grey) – $3.80 w/ free shipping on Amazon.  Contains 18 strips.

Ease of Removal

All of the nail wraps were easy to remove.

Chemical Component

I’ll be honest, I haven’t had time to go through and find out what all the chemicals mean in understandable terms.

For instance this is what is in the Sally Hansen wraps:Nail-Wraps-Compared

Nitrocellulose, Polyethylene Terephthalate, Adipic Acid/Neopentyl Glycol/Trimellitic Anhydride Copolymer, Acetyl Tributyl Citrate, Triphenyl Phosphate, Isopropyl Alcohol, Butyl Acetate, Calcium Aluminum Borosilicate, Stearalkonium Bentonite, Calcium Sodium Borosilicate, Silica, Synthetic Fluorphlogopite, Polyvinyl Butyral, Acrylates Copolymer, Benzoaphenone-3, Phosphoric Acid, Tin Oxide, [may contain +/-: Mica, Titanium Dioxide (CI 77163), Bismuth Oxychloride (CI 77163), Aluminum Powder (CI 77000), Iron Oxides (CI 77491, CI 77492, CI 77499), D&C Red No 6 Barium Lake (CI 15850), D&C Red No. 7 Calcium Lake (CI 15850), D&C Black No. 2 (CI 77266), FD&C Yellow No. 5 Aluminum Lake (CI 19140), FD&C Blue No. 1 Aluminum Lake (CI 42090), D&C Red No. 34 Calcium Lake (CI 15880), D&C Orange No. 5 (CI 45370), D&C Yellow No. 11 (CI 47000), D&C Red No. 22 (CI 45380), D&C Red No. 28 (CI 45410), Ultramarines (CI 77007), Ferric Ammonium Ferrocyanide (CI 77510), Manganese Violet (CI 77742), Violet No. 2 (CI 60725)].

I do know however that Jamberry wraps are free of formaldehyde, toluene, formaldehyde resin, camphor, and DBP.

Durability

This is what everyone has been waiting for.  Drum roll please….

These pictures are taken 15 DAYS AFTER APPLICATION!  That’s pretty remarkable in my opinion.

– Essie – It lasted well.  Being my thumb nail it got a lot of use and endured well.  When it began to show wear it slowly wore away at the end of the nail a bit.  Around day 9 it started chipping at the end of the nail and the rest of the nail remained in tact.

– Sally Hansen – It held out for the long haul too.  It slowly wore away at the edges and around day 13 I noticed some cracking in the polish.  I guess my nail bent at some point and instead of giving the wrap just cracked.  It was hardly noticeable at all and that was almost two full weeks of wear.  Day 15 the top of the nail started showing chipping too.

– Jamberry – It lasted well but began “lifting” after three days.  Some have suggested that a base coat would have helped it initially adhere better or a gel top coat would help it last longer but I didn’t use either of these.  The slight lifting remained slight until day 9 when the left side started to lift as well.  Day 12 the right side was lifting but it held in place and still looked nice.  You couldn’t tell that the wrap wasn’t fully secure just by looking at it so I lifted the wrap with my other finger to show you that it wasn’t connected all around.  You may notice in the picture below that the nail wrap rotated on my nail a bit.

– OPI – This wrap did the best I would say!  It barely wore away at the edges even after 15 days.

– Kiss – The gemstones stayed on well until day 10 when two came off.  It started chipping ever so slightly on day 9.  It started lifting on day 12 and by day 15 it was barely hanging on and many of the gems had fallen off.  However, I have to point out that Kiss wraps only promised to stay 10 days and they did that!

I played, I painted, and I washed and washed my hands.  I wasn’t easy on these nail wraps by any means and I am impressed with them all.  Each of them hold up better than regular nail polish and I’ll likely use them all again.

*Extra Notes*

  • – All of the wraps besides the Jamberry ones say that they are only good for one application because the rest of the wraps will dry out (they’re polish strips) BUT I stored them in a baggie right away and I’ve been able to use them again without any problem.
  • – All of the nail wraps have a nail polish scent except for Jamberry.  If you hate the scent of nail polish you’ll want to go with Jamberry wraps.
  • – Can you believe how fast my nails grew?  With that much growth in 15 days I’ll never need a nail wrap to last longer than a week!

Nail Wraps Day 15

What do you think?  Did you predict right?  PLEASE tell me if I didn’t answer a question that you had!  I want to be as helpful as possible.


Nail Wraps Compared – Sally Hansen, Jamberry + More

Nail Wrap Comparison
I’ve been thinking about doing this post for a while and I’m excited to finally be doing it!!  I’m currently reviewing five different nail wrap (stickers, decals, shields, or whatever name you call them).

I’m only on day two and they look the same as they did on day one, pictured above.  I’m going to be wearing these for a full week and I’ll report back to you with the results.  I’ll be judging them based on the following aspects:

  • – Style/design
  • – Ease of application
  • – Durability
  • – Ease of removal
  • – Chemical components
  • – Shape of wraps
  • – Cost

Do I have a dog in the fight or am I pulling for a specific brand?  No, not really.  When I post my full review I’ll have affiliate links to all of the wraps so you can buy them if you’d like {except for Jamberry and that will link to my friend’s site where I make no profit at all}.  You’ll be getting my full, honest, 100% authentic opinion, just like always but sometimes I feel that it’s important to point that out.

I’m anxious to see how they’ll hold up!  Are you?  Which design is your favorite?


UPDATE: You can now go and see our Nail Wrap Review!

Chevron Nail Art With Jamberry #ManiMonday

Chevron Nails
Happy Tuesday!  I hope your weekend was as enjoyable as mine was.  I had this post planned to be a #ManiMonday post but yesterday but my day didn’t quite go as planned.  I tried to put my son to sleep unswaddled for the first time and he was having none of it.  That threw him off his schedule and I said goodbye to  my “Mommy time.”  Such is life!

Being in the summer sun has me craving pretty toes and fingernails!  Do you get that way too?

This manicure features Dazzle Dry’s polish and Jamberry’s nail wraps.  I think they make a great summer combo.  This is one of my favorite manicures I’ve had in a long time!

Outside of the Dazzle Dry’s five minute dry time and the trimming of the Jamberry wraps it was a pretty fast and painless process.

Have you picked up any of the Jamberry summer colors yet?  What do you think of this manicure, is it a technique you would try at home?  If you recreate this look, tag me on Instagram, Twitter, or Pinterest. I’d love to see your take on it!

Disclosure: Affiliate links appear in this post. When you purchase through an affiliate link, you help support this site (or my friend’s Jamberry business that I make no profit from).