

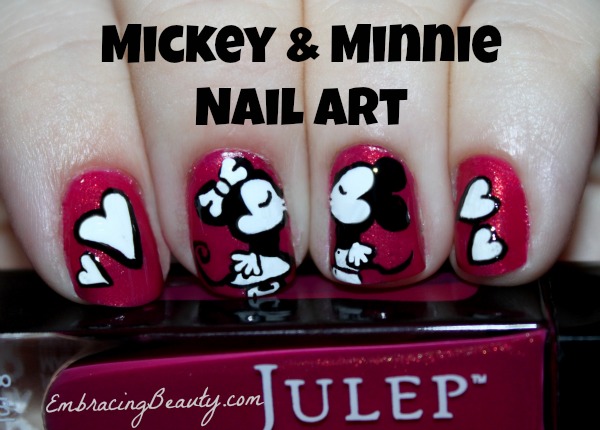
Minnie Mouse is one of my favorite Disney characters! She’s adorable for little girls and grown up girls too! I love her sweet face, her relationship with the mouse who started it all, Mickey, and her love of polka dots. What’s not to like?
If you follow me on Pinterest {and I hope you all do!} you’ve been bombarded with my Minnie Mouse pins lately. I’m sorry about that! You see, my little girl is about to turn two and I’m searching for every idea possible to make her Minnie Mouse party a success. {Check out my DIY Minnie Mouse Halloween costume I made her.} While browsing and browsing I found quite a few cute Minnie Mouse nail designs {which I pinned on my Pretty Nails board}. Some were simple and some were far above my skill level. I chose to do a design that was right in the middle. It stretched me out of my comfort zone and I’m very pleased with the results. If you think these are awful, please keep your comments to yourself. Don’t bust my bubble!
My favorite Mickey and Minnie images are from the 70’s and 80’s. Do you remember the ones? Minnie wore a blue dress, yellow shoes, and a hat with a flower in it? I tried to make my characters look like the ones from back then except that Minnie has a bow instead of a hat.
Have you ever done your own Mickey and Minnie Mouse Nail Art? If so, I would love to see it!
Products Used:
Here is a list of the products that I used for my Mickey and Minnie Mouse Design:
- – Julep Polish in a beautiful shade that isn’t available yet….that I got to name!!! I can finally cross that item off of my bucket list. This color will be making it’s debut soon. Don’t you want to buy it? I think it’s absolutely beautiful! My poor photography skills make it look a little darker in the picture than it actually is but don’t you love the rose gold flecks in it? Even if I didn’t have the privilege of picking the color and naming it myself it would still be my favorite polish.
- – White Nail Art Paint (Milani)
- – Dotting Tool
- – Black Polish (Sally Hansen)
- – Base and Top Coat (Julep Base Coat, Julep Polymer Top Coat)
I’m sorry that this isn’t a tutorial post but I don’t think I could do it again if I tried! I set aside a block of time, figured out what I wanted my design to be, and carefully applied each stroke. Sometimes I used my dotting tool or my fingernail to remove a little paint if I went a little too far. After I was happy with my design I sealed it off with a top coat.
Even though this isn’t a tutorial, I would be happy to do my best to try and answer any questions you might have so please feel free to leave them in the comments below. Plus, feel free to leave a comment here telling Julep what you think of their new polish color!


Recent Comments